Deconstructing the Image - What Effects Go Where, Shapes & Enlarging.

Status
Not open for further replies.
Thanks a lot Mich Noted and I'll try it definately. Nice to learn something... :tennis:
 
My Answer:
View attachment 6002

Now as subjective as i am about how you create your effects, i'm taking an arrogant stance on this one and encouraging you to see it my way.
One thing i think is important to point out here is the idea of creating a single shape using multiple effects.
You don't always have to create the shape with one effect, it is possible that you can create certain shapes using two effects or more.
Take the example of the top square in the picture above where you have the tiny effect to the side of the nose - if you study this shape and want to be fussy, you can actually distinguish two blends, each overlapping the other in opposite directions. If you can see this then great! however for the sake of drawing out your images, if you see they have two sides, simply choose a side to draw your selected effect from.
We're simply trying to identify shapes here and determine how to re-create them!

Questions time! if you have any? I think i've even confused myself.

thanks for the feedback Mitch, on your answer sheet you have the blend under the nose and a line above both 1 over 10. The line above is it a line at 1 cm 100% opa overspray directed up? It looks as thou your using the same figures for both strokes, is that correct? Thanks again.

tufty
 
You know what you're doing.
two things - i'd revisit the effects you decided that were dagger strokes and change them to blends and i think you should do the top effects from a larger height!
besides those two things.. i think you've nailed it.
Thanks Mr. Tutor (Mitch). That made me feel really great, like I'm actually getting this stuff LOL. :surprise:
 
thanks for the feedback Mitch, on your answer sheet you have the blend under the nose and a line above both 1 over 10. The line above is it a line at 1 cm 100% opa overspray directed up? It looks as thou your using the same figures for both strokes, is that correct? Thanks again.

tufty
Hi Tuft - yeah that little line shouldn't be 100% - should only be the same as the effects to each side which i think i did at 50% - sorry mate i didn't do any details for that - should be about 3cm in height and 50% done at an angle. I stuffed up mate. woops.
if anyone doesn't agree with something i've done let us know - i think it's good to discuss it.
Will post a new exercise shortly.
 
Exercise 3!

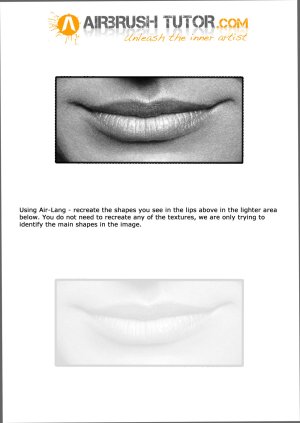
Here we have what is quite obviously a pair of lips. The lips are heavily covered in texture, however i want you to do this exercise and only show the main shapes of the image, ignoring all textures.
The best way to identify shapes in an image is to ignore textures, you can do this by looking at the image and unfocusing your eyes - or slightly crossing your eyes. This blurs your vision and gets rid of all textures, allowing you to see only shapes and dimension.
Ignore the textures in the image below and let's see how you go at identifying the shapes!

airbrushtutor-pdf-template3.jpg

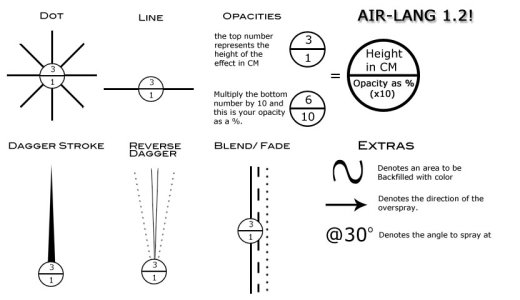
In case you didn't see it in earlier posts - check out Air-lang below and use this to come up with your answer :)

air-lang.jpg
 
ImageUploadedByTapatalk1351812661.813487.jpg
I tried to get my heights/opacity written clearly but some of it is kind of close together. (Like the lines on the lips).
 
I think I am the first to flunk Mitch's school (sucks). I have a problem with numbers. If there is such a thing as number dyslexia then I have it. I can't remember house numbers, phone numbers etc, and math is a mystery language, I cannot think in numbers, or even read more than two or three in a row without them getting jumbled. So I just can't look at a picture and translate it into numbers I'm afraid. But I can see how it's helping everyone else, and so I'd like to wish you all top marks, and hope you all graduate with honours (which you will under Mitch's expert care), just sorry I can't join you.
 
This is the coolest thing I have ever seen on any airbrush website anywhere! Can not wait to see where this goes!
 
View attachment 6053
I tried to get my heights/opacity written clearly but some of it is kind of close together. (Like the lines on the lips).
Alaska - i think you've done a pretty accurate job here - the only two things i would point out are the height of your top blend which you've stated at 2cm heigh - probably increase this to 4 or 5cm - this isn't that important though because depending on how you pull off the blend, you wouldn't see that sharp edge anyway - so what you've done would still look right. Second is the height of your bottom blend - i think you should definitely sharpen this effect and would recommend it be done from 1cm height. This is probably the hardest effect on these lips because it forms the line and you have to be in so close. I agree with all of your effects though, could definitely be done this way!

This is the coolest thing I have ever seen on any airbrush website anywhere! Can not wait to see where this goes!
What a legend.

View attachment 6080 How's about this for a try?

Hi doxie - I'm just trying to determine if you've mainly used lines to build this up? If that's the case it can certainly be done this way - however i think you should show more angles. Take the top of the lip for example - you've shown a line (i think the height and opacity is 4cm @ 40%) - i agree with the height, if you're using an airbrush like a krome then 4 cm would be right, however generally in areas where you're going to need to back fill, it's best practise to angle your edges into the effect. the reason for this is because it encourages a nicer blend! you can backfill without risking overspray going past your edges and onto the outside of the effect where it isn't required.
Directing overspray is something to be very conscious of when creating airbrushed artworks..
I think you should keep at this - it looks like you're identifying the shapes correctly, it just appears that you haven't drawn it on exactly as per the language. Take the bottom of the lip for example and i can see the area you're saying to backfill is in fact a very soft shape and a difficult one to identify if you've just started doing this - however this would be best achieved by overlaying another blend at a much larger height than the one done on the bottom of the lip at 1cm height (see comments to Alaska above).

Backfilling is generally left for areas such as the top lip - where the shape looks flat and there is no real dimension - a pupil would be done this way where we perform the airbrush effect angled into the darkest area and backfill - however for soft tones of a face or in this example the top left and right hand side of the lips - these are definite effects only created at much larger heights than the rest of the image.

I find with decoding that there are two main areas to break things up - the darkest shapes - the most obvious parts of the image, generally the sharpest areas and the soft shapes - such as dimension on a cheek, the sides of a nose, the dimension on the chin. In order to re-create an image accurately, you should learn to identify which are the sharp and soft shapes of an image and learn how to airbrush them effectively by deciding on the right effect at the right height and opacity.

any questions?
 
Alaska - i think you've done a pretty accurate job here - the only two things i would point out are the height of your top blend which you've stated at 2cm heigh - probably increase this to 4 or 5cm - this isn't that important though because depending on how you pull off the blend, you wouldn't see that sharp edge anyway - so what you've done would still look right. Second is the height of your bottom blend - i think you should definitely sharpen this effect and would recommend it be done from 1cm height. This is probably the hardest effect on these lips because it forms the line and you have to be in so close. I agree with all of your effects though, could definitely be done this way!

Thanks Mitch. Appreciate the feedback and I went back and looked and you're absolutely right. Looking forward to the next lesson. :) I've been at this for about 6-7 weeks now and it's thanks to you and your tutorials and lessons that I really am getting this down. Thanks so much for everything. :loyal:
 
I'm gonna get more involved with this son of a gun just as soon as I can....
 
Hi doxie - I'm just trying to determine if you've mainly used lines to build this up? If that's the case it can certainly be done this way - however i think you should show more angles. Take the top of the lip for example - you've shown a line (i think the height and opacity is 4cm @ 40%) - i agree with the height, if you're using an airbrush like a krome then 4 cm would be right, however generally in areas where you're going to need to back fill, it's best practise to angle your edges into the effect. the reason for this is because it encourages a nicer blend! you can backfill without risking overspray going past your edges and onto the outside of the effect where it isn't required.
Directing overspray is something to be very conscious of when creating airbrushed artworks..
I think you should keep at this - it looks like you're identifying the shapes correctly, it just appears that you haven't drawn it on exactly as per the language. Take the bottom of the lip for example and i can see the area you're saying to backfill is in fact a very soft shape and a difficult one to identify if you've just started doing this - however this would be best achieved by overlaying another blend at a much larger height than the one done on the bottom of the lip at 1cm height (see comments to Alaska above).

Backfilling is generally left for areas such as the top lip - where the shape looks flat and there is no real dimension - a pupil would be done this way where we perform the airbrush effect angled into the darkest area and backfill - however for soft tones of a face or in this example the top left and right hand side of the lips - these are definite effects only created at much larger heights than the rest of the image.

I find with decoding that there are two main areas to break things up - the darkest shapes - the most obvious parts of the image, generally the sharpest areas and the soft shapes - such as dimension on a cheek, the sides of a nose, the dimension on the chin. In order to re-create an image accurately, you should learn to identify which are the sharp and soft shapes of an image and learn how to airbrush them effectively by deciding on the right effect at the right height and opacity.

any questions?

Hi! I'm stoked about this forum! Thanks for looking at the lips homework you gave us. You're right, I forgot to put the kind of line I was going to use, and as far as speaking that airlang, well, I hardly speak English as well as I'd like to, so I will have to work on that! :adoration: Lines, are currently all that I am very familar with, I have only been playing with dots and lines on canvas for the past week. I did however post a pic I have started of and Akita( my very first airbrush painting) today in the gallery...
Reading your reply, I am thinking back to my painting last night, and the backfilling I was doing, I understand your description of backfilling now. I did do that in the dog's pupils. So, considering the lips homework, I will have to say, I must've been lying when I said that I would backfill underneath her lips. *smacks my forehead *
I will work on my angles. I started to do that unwhittingly last night during my painting and corrected myself to a straight line again. So, good to know that angles ARE a part of the process.
 
Exercise 4 - Identifying Shapes

After learning how to master control of your airbrush, the next hardest step is learning to identify shapes in an image. Part of this difficulty is due to the amount of extra information being thrown at you from the image - it makes it very difficult to identify the shapes. For this reason it's important to take a step back - to look at the bigger picture.
All shape is, is dimension. A cheek is covered by skin texture, but the accuracy of the cheek won't be complete without the correct dimension. I would encourage everyone to build artworks by first airbrushing accurate shapes (adding dimension) and then moving in to create texture and realism on top of the shapes.

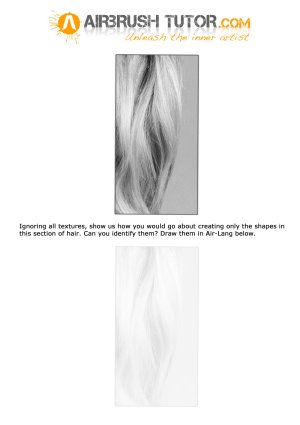
airbrushtutor-pdf-template4.jpg

The above image shows a portion of hair from an image. Hair may be one of the trickiest places to learn how to identify shapes and dimension as you could argue that it is only texture. However, the truth is that you need very little hair texture to achieve the same depth you see here - because the depth comes mainly from correct dimension and shapes.
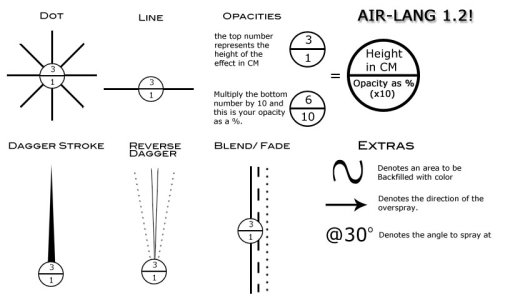
Identify the main shapes in the image above using Air Lang shown below. We are only looking for around 4 main shapes and between 10 - 12 effects. Ignore any texture for the time being.

air-lang.jpg

Please feel free to ask if you have any questions!
Tufty, come on mate, back into it.
 
(my hand is up in the air)
Teacher ! Where can (if we can) download those pdf templates ?
 
(my hand is up in the air)
Teacher ! Where can (if we can) download those pdf templates ?

Just click on the picture of the PDF - when it comes up in the lightbox - click on it again, run your cursor over it so the magnifying glass shows up then click on it again - then right click and 'save picture as'. then you can print it:)
 
Sorry teach the dog eat my last homework! Works been nuts, I've been on call all week so back into it full throttle again now.
 
I'll post the answers up for the above exercise 3 in 2 days time - would like to see people attempt it before i give out the answers!
This means you! [insert war propoganda sign here]
Best way to learn is through your mistakes.. so don't be shy - the more you make now, the quicker you learn.
 
Status
Not open for further replies.
Back
Top