dried paint texture

N

Neural

Guest
How smooth should dried paint be before any clear coats or such are added to it?

I have noticed my painting, while it looks great, is almost like 800grit sand paper.

If it is not supposed to be like this, what should it feel like, and should I look at the pressure I'm spraying with, or more towards the addatives?
 
Without been a pro and from what I know, sounds like your paint hasn't been completely atomised hitting the surface. As you mentioned, you need either higher pressure or reduce your paint further. Just giving you a hint, but someone will guide you better.
 
It would be helpful if you could provide a few extra details of what you are using like:
Paint
Airbrush
Reducers
Substrate.
 
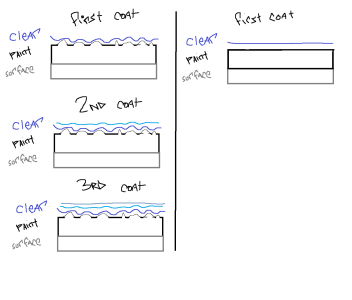
A clearcoat works like a waterlike mirror on top of your project, so if u poor that goodie over a un even surface it will look like there are waves in the mirror.
The more coats u throw (wet coat over wet coat) , the more the clearcoat will fill itself and all the uneven places and the waves become more even and mirror flat.
So if your painting already looks uneven the clearcoat will show that , but can be fixed with alot of clearcoat until it's even.

I did this little drawing , on the left is when paint sticks out and is not even.
on thje right the paint is even.


clear.png

Another example picture(the right shows that also clearcoat does sometimes give gridpaper effect) , thats why clearcoats also needs sanding after drying)

klarlacke-matt_en_530.jpg


So the more uneven the basecoat / paint or primer , the more clearcoat u need to fill and even it.

The best way is good prepping , make the surface smooth to start with , prime the surface and sand that smooth again.
Then your basecoat is already much smoother , and the paint on top also.

But if your basecoat is silky smooth and the airbrush paint will make your project bumped up then u can:

1. Reduce your paints more.
2. Too much overspray will give orangepeel (grid like) ,
problem overspray: paints sprayed in too thick layers , too much pressure
3. Test your paints with more or less heat as temperature can effect your paint curing (paints need to settle down)

I hope this helps

ps. sorry for the bad english (iam a dutchie).

greets Souldog Airbrush
 
A clearcoat works like a waterlike mirror on top of your project, so if u poor that goodie over a un even surface it will look like there are waves in the mirror.
The more coats u throw (wet coat over wet coat) , the more the clearcoat will fill itself and all the uneven places and the waves become more even and mirror flat.
So if your painting already looks uneven the clearcoat will show that , but can be fixed with alot of clearcoat until it's even.

I did this little drawing , on the left is when paint sticks out and is not even.
on thje right the paint is even.


View attachment 51827

Another example picture(the right shows that also clearcoat does sometimes give gridpaper effect) , thats why clearcoats also needs sanding after drying)

klarlacke-matt_en_530.jpg


So the more uneven the basecoat / paint or primer , the more clearcoat u need to fill and even it.

The best way is good prepping , make the surface smooth to start with , prime the surface and sand that smooth again.
Then your basecoat is already much smoother , and the paint on top also.

But if your basecoat is silky smooth and the airbrush paint will make your project bumped up then u can:

1. Reduce your paints more.
2. Too much overspray will give orangepeel (grid like) ,
problem overspray: paints sprayed in too thick layers , too much pressure
3. Test your paints with more or less heat as temperature can effect your paint curing (paints need to settle down)

I hope this helps

ps. sorry for the bad english (iam a dutchie).

greets Souldog Airbrush
helpful man.. nice
 
It would be helpful if you could provide a few extra details of what you are using like:
Paint
Airbrush
Reducers
Substrate.

Hi, :)

The paint is Candy2O
Airbrush is a Paasche Talon with a TN-3 .66mm needle/tip (for larger spray area, as I'm not doing detail work currently)
I use a little 4012
Substrate: Ground aluminum.

I try to use medium grit items to do this part so things don't get super rough, but as you can guess, the entire piece is going to be anything but a flat smooth surface. However, tthe 800/1000grit feel I get from the surface after painting is actually substantially different from the feel of freshly ground aluminum. It is literally like moving my finger tips across 800/1000 grit sand paper, whereas the bare ground aluminum doesn't want to grab the skin as much.

Also, the reducers and additives are likely my weak point. Much as I want to play with my new compressor today, I'm going to try and write out, by hand, the key points about the different additional items that can be mixed in with the paint (please bare with me there as I *do* have a learning disability. It takes me a bit to grasp some things, mostly due to physical neurological issues).

For reference regarding what I currently have to work with:
I have all the items that came in the full color set of Candy2O that my mother bought me for Christmas. This is the colors, plus 4004, 4012, and 4030.

I'm a little confused on the 4004 (transparent base) vs. the 4040 (bleed chcker). As I understand it, the 4012 and 4020 are similar as well.

Overall, for now, using the resin as a final coat resolves any issues with smoothness, that's for sure, and I can make what I'm doing work. My main concern is that due to inexperience, I don't know if my results are what they should be for the surface I'm working on, and at this point I'm more concerned about getting it right than getting it pretty.

I think you're lack of experience is causing you to worry about nothing, all you have is a build up and it's quite normal, it probably feels worse to you than it maybe really is, in pretty sure that if you clear it as has been suggested, the problem, if indeed there is one, will sort itself out.

You will probably find that most base coats and undercoats if you ever have the occasion to use them will have a similar feel to them, in my job that feel tells us that the subsequent finish will have a good key.

The 4004 trans base you mention, I would assume that that just allows you to dilute your colours without affecting viscosity so you can build up your work more slowly if you needed to, the bleed checker is exactly that, it stops your colours bleeding into anything coming after it.
 
I think your problem is the amount of candy overspray u get , that results in a griddy surface,
Try to build your candy's in crazy thin layers , and try that with and without the reducer, because those candy's are thin enough.
U can also experiment with candy2O mixed with 4030 intercoat and reducer , but also very thin layers.

Regarding the 4030: I've been mixing with that from the start, but I'm wondering if temperature might be a problem.
I live in Las Vegas, and while it's dry as a bone pretty much year round, right now the garage is around 58 to 65F when I'm out there working

As Malky mentioned, I may be worrying about nothing. The end results I'm getting are good (posting a new image of a finished piece next).
 
Though I'm far from an expert, gritty/sandy looking finishes are something I associate with atomized paint drying in the air between the gun and the work surface. Usually I see it when the gun is being held too far away from the surface during spraying, but if it's really hot and dry out, that can reduce the distance required for this to happen. A gun that produces a lot of fogging overspray could maybe do it as well, as those fog droplets swirl around and deposit themselves on parts of the work surface outside the immediate spray cone.

A a modeler I've actually deliberately exploited this to create surface effects like snow or dust, but, yeah, in the majority of cases it's undesirable. Not just cosmetically: the coats that are "gritty" like this tend to have poor strength and adhesion, as they're microscopically like a porous layer of loosely glued together sand instead of having a solid layer of binder. If your paint is a sold color, and you catch it within the paint's cure window, you can fix it by fine-grit wet sanding followed by another coat.

If you catch it after the cure window, then you can "armor" it with enough clear coat, as Souldog describes. That layer under the clear will still be weak, but if it's sandwiched between a good surface prep and an ironclad clear, that can be okay.
 
The candy needs to be mixed with the 4030 then thinned with a little 4012. The candy is the colour and the 4030 is the carrier. You can dilute quite a bit with the 4030, I have used one drop candy to 10+drops 4030 and thinned with about 5 drops 4012 and it sprayed nice through a 0.3 nozzle.
The 4004 can be used ONCE between colours to stop bleeding of the colours. It can only be used once because it is also mixed with 4012 to thin it so if you use it more than once it will reactivate what the paint you have underneath and the colours will bleed. That is where the 4040 bleed checker comes in. That is sprayed right out of the bottle do not thin with 4012. Using this gives a dissimilar barrier between colours and th colours will not bleed.
For the gritty feel I agree it sounds like overspray. One way to fix it would be to lightly wipe down the surface with a weak degreaser ( I have heard that you can use the 4020 automotive reducer as long as you have not used it to thin the paint) or use a tack cloth. Use these lightly and should remove some of the over spray. I sometimes use a lint free dry papertowel all depends on what I am working on.

How are you prepping the metal? When I do ground metal especially if it is steel and has deep marks in it, I will wipe with a degreaser then spray a little adhesion promoter. Once that dries according to the directions I put on a few good coats of clear and let dry then sand with 600G wet dry sand paper. Wipe off the dust then spray on the colour. I find doing this gives a real nice deep colour and makes the grinder marks really shine through. It is an extra step but I found that with out the clear base colour would puddle in the low areas and appear darker when finished.

Hope this helps. Sorry it is long, I guess I am in rambling mode today lol
 
I think you're lack of experience is causing you to worry about nothing, all you have is a build up and it's quite normal, it probably feels worse to you than it maybe really is, in pretty sure that if you clear it as has been suggested, the problem, if indeed there is one, will sort itself out.

You will probably find that most base coats and undercoats if you ever have the occasion to use them will have a similar feel to them, in my job that feel tells us that the subsequent finish will have a good key.
Yep! @Malky called it. If it feels like 800 grit, you are right on the money! You're hitting dead on what you're supposed to strive for. The whole createx line will go smoother, but if you're intending to clear it , much smoother is actually too wet. Look at the application guide ( dries to a MATTE finish)
600 you're getting a little rough
fresh 400...you're dry spraying
1500.... you probably need to sand with 600- 800 before you clear.


The candy needs to be mixed with the 4030 then thinned with a little 4012.
When I do ground metal especially if it is steel and has deep marks in it, I will wipe with a degreaser then spray a little adhesion promoter. Once that dries according to the directions I put on a few good coats of clear and let dry then sand with 600G wet dry sand paper. Wipe off the dust then spray on the colour. I find doing this gives a real nice deep colour and makes the grinder marks really shine through. It is an extra step but I found that with out the clear base colour would puddle in the low areas and appear darker when finished.
This is gold for your application!
Depending on the exact look you want.


The more coats u throw (wet coat over wet coat) , the more the clearcoat will fill itself and all the uneven places and the waves become more even and mirror flat.
So if your painting already looks uneven the clearcoat will show that , but can be fixed with alot of clearcoat until it's even.
To a degree....
This is more when/if you decide to use something besides that epoxy to clear with;
You will likely find yourself needing to spray a few coats, then 600 wetsand, spray a few more coats, then 600 wetsand. Until you can get a coat to lay down smooth. It's really the only way to level off scratches that are wider than your film thickness, which you will have plenty of on ground aluminum.
Wider scratches will follow a paint film until its quite a bit thicker than the scratch is wide unless you sand between coats.
 
Last edited:
Back
Top