Deconstructing the Image - What Effects Go Where, Shapes & Enlarging.

Status
Not open for further replies.
1 terms homework will cost you a micron madbrush.

the class squat is first to post again, so copy it but change the pen colour lol.

Looks like I'll be failing then, I can't afford a Micron, spent all my sweets money on an ornamental evolution, lol should have went for working model.

You've certainly got the hang of this, the obvious difference between you and me is you've actually earned your' 3 gold stars, but at least I was first to get a pointy hat and have my own special corner to sit in.

ive posted something up wether it's right is another thing lol.

I'm hoping this will help me in my air brush quest. Actually having heights and angles being shown helps me a lot.

You still having problems with the evolution?
 
ive posted something up wether it's right is another thing lol.

I'm hoping this will help me in my air brush quest. Actually having heights and angles being shown helps me a lot.

You still having problems with the evolution?

I'm having no problems at all with the evolution since I binned it all the problems stopped, lol.

As for your airbrush quest, your performance here shows your not just playing and therefore also shows promise, the imagination in your comp piece shows that you have it in you to produce when needed, you have the patience for planning so I reckon you'll be pumping out masterpieces in no time.

I promise not bully, but keep an eye out for Seamonkey, your starting to make his "football apple" look like a grape, lol

But he's the school prefect, Top Dog. He has given the teacher a bloody orchard lol.
 
I think this really helps. I lost my phone so as soon as I get it back I will post mine. It's is making me really pay attention to detail in an image. Just a suggestion for the name of the language...what about airbonics?

-sheena
 
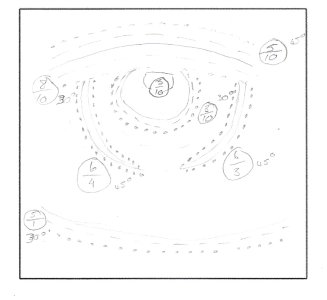
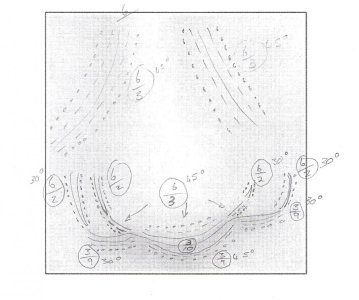
Ok so after taking up airbrushing seriously for only 4 weeks this is a rather nubish attempt at deconstruction. But as Mich said, there is no right or wrong. But I'm here to learn so here is what I came up with on the eye and nose.eye.jpgnose.jpg
 
I have to sit this one out as well and see how this is done. I'm not sure exactly what is going on. Guess I am a little slow!
 
Last edited by a moderator:
ImageUploadedByTapatalk1351397087.368634.jpg
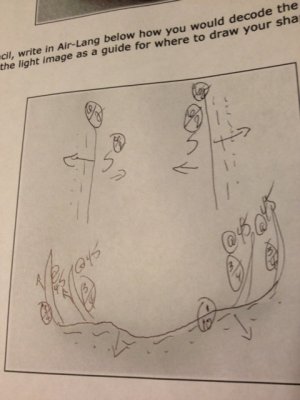
Sorry it's a little messy kind of rushed it, but this is what I came up with.
 
1 terms homework will cost you a micron madbrush.

the class squat is first to post again, so copy it but change the pen colour lol.

Tufty:
You're definitely on the right track but i'd like to mention a couple of things.
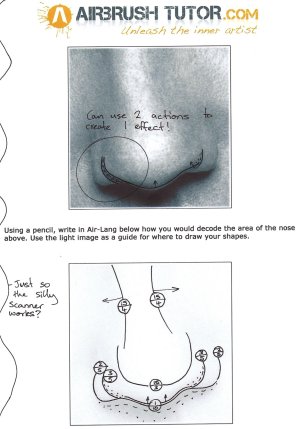
Firstly your heights - around the nasal region i feel is quite good however it looks like you've undershot those much softer shapes on the top of the nose. this should be done at a nearly indistinguishable height and are the easiest effect of this image because they should be done from around 15cm high!
I see what you're doing with the bottom of the nose, using a solid line, another directional line and backfilling, however i'd recommend against doing it this way as you're risking creating streaks in your artwork if the paint isn't overlapped nicely. The best way to pull of sharp effects like this and with a sharp blend - blending outwards and using your height to create that outer edge instead of a separate effect.
I do see how the edges of the nose look like dagger strokes and i think these would work if they were a dual effect - a dagger stroke and a directional line, however to achieve both these effects in one, you could simply use a blend.
To anyone reading this, dagger strokes by themselves are quite uncommon - except for hair, where they're everything.
the last thing is the direction of your blend on the edge of the nose, i think you should have done this effect from the opposite direction.
I'm happy with how you've done mate as the second image i think you've re-created it nicely, but could be tweaked - to take this one step further you could actually practise doing the effects your way and see how the image turns out.

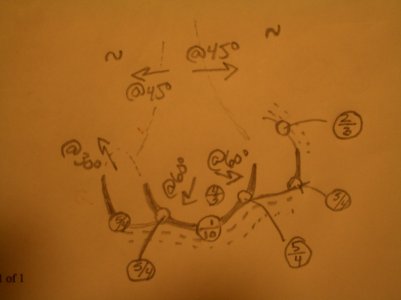
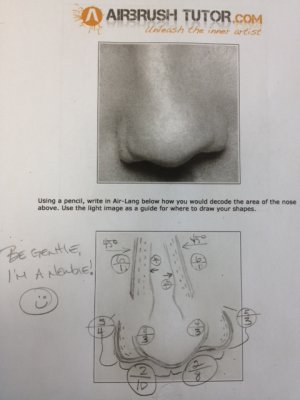
View attachment 5886this is my take on this image .we will see how it goes

Shane! mate if you could make your image a little larger next time:cupcake:
Your bottom effects - spot on! Exactly like i commented to tufty i think blends would be better suited in these areas, however in the case of what you've put down there, i think you'd need to be at a slightly lesser height.. like 3 cm or so? But i do agree with the opacity - I think around 50% is good.
I completely agree with your effects at the top of the nose here mate, however i'd like to see a height! Naughty corner for you.
These should be around 15 cm height.. very soft effects!
Good work though, i didn't expect people to go so well off the bat!

Ok so after taking up airbrushing seriously for only 4 weeks this is a rather nubish attempt at deconstruction. But as Mich said, there is no right or wrong. But I'm here to learn so here is what I came up with on the eye and nose.View attachment 5916View attachment 5917

I'll just cover the nose here.
The bottom effect of your nose could more easily be done as one effect - just a simple blend done at a very sharp height of 1 cm! it's a bit of a difficult effect to pull off but is the best way to achieve it.
I can see how you thought the left effects could be reverse daggers.. but i wouldn't recommend them here.. i think the effects on the side of the nose show definite edges and they're consistent.. you'll find more reverse daggers in areas like lips and eyes..
Your opacities on the bottom effects could go a little darker, it's difficult to distinguish how dark 20% is but it's actually pretty light.
I think you've got the right effects for the areas above the nose, however you could achieve these with a single blend done from a larger height and pointing outwards from the nose. These should be around 15 cm from the canvas to create the correct inward and outward edges of the effects!

View attachment 5957
Sorry it's a little messy kind of rushed it, but this is what I came up with.

You know what you're doing.
two things - i'd revisit the effects you decided that were dagger strokes and change them to blends and i think you should do the top effects from a larger height!
besides those two things.. i think you've nailed it.
 
thanks again airbrush tutor,i always enjoy learning from someone of your talent ....looking forward to the next assignment
 
You know what you're doing.
two things - i'd revisit the effects you decided that were dagger strokes and change them to blends and i think you should do the top effects from a larger height!
besides those two things.. i think you've nailed it.

A Quick question Mitch, I am following this and trying to keep up, and this is a question and not an observation, although I would also have put dagger strokes in the same place, and please excuse my stupidity, as you say blends instead, but would it be fair to say "a blended dagger stroke", I ask that because If I tried to actually do this myself, I would probably immediately think dagger but with more height and at greater angle therefore causing a combination of both effects.

I'm probably wrong, so don't afraid to tell me to put my pointy hat back on, lol
 
My Answer:
Answer!.jpg

Now as subjective as i am about how you create your effects, i'm taking an arrogant stance on this one and encouraging you to see it my way.
One thing i think is important to point out here is the idea of creating a single shape using multiple effects.
You don't always have to create the shape with one effect, it is possible that you can create certain shapes using two effects or more.
Take the example of the top square in the picture above where you have the tiny effect to the side of the nose - if you study this shape and want to be fussy, you can actually distinguish two blends, each overlapping the other in opposite directions. If you can see this then great! however for the sake of drawing out your images, if you see they have two sides, simply choose a side to draw your selected effect from.
We're simply trying to identify shapes here and determine how to re-create them!

Questions time! if you have any? I think i've even confused myself.
 
A Quick question Mitch, I am following this and trying to keep up, and this is a question and not an observation, although I would also have put dagger strokes in the same place, and please excuse my stupidity, as you say blends instead, but would it be fair to say "a blended dagger stroke", I ask that because If I tried to actually do this myself, I would probably immediately think dagger but with more height and at greater angle therefore causing a combination of both effects.

I'm probably wrong, so don't afraid to tell me to put my pointy hat back on, lol
100% correct mate - this is actually a pretty advance concept but you could create the effect using both a blend and a dagger stroke! to get way ahead of ourselves, you'd actually blend the dagger stroke.. but that's getting quite advance and not what i'm trying to teach just yet!
I'm glad you brought this up though, that's exactly what i was hinting at - creating what looks like a single effect, using two effects but combining them.
2 gold stars for you Madbrush (just to be patronising)!

Wow, Thanks Mitch, my theory was honestly just a guess, but I've practised this on some of my work mainly for the speed with success (sometimes lol) So I don't have to pick up my pointy hat from the cleaners just yet?

@Tufty, NA NA NA NAAA NA!!!, sorry a little jealousy creeping in there, I really must keep that under control, lol

I'm not fully understanding the airbrush language just yet, but I'll continue looking over shoulders for a while.
 
nose.jpg Hi! Here's my idea... I am Totally new at this, I just picked up my airbrush for fun again after 4 years of having it in the box. I didn't really understand how to use it then, and got frustrated with it, so in the box it went. I have been using the airbrush at work for cosmetic purposes, so that's what sparked my interest again. There really isn't anyone to teach this technique in my area, so I have just been trial and error-ing it. *if that's a word!!* > That really means I've been cursing it alot. I've been trying to get my paint mixture down to a fine science, as I have a ton of acrylic paint from previous obsessions. I spent the entire night last night fighting my plugged up airbrush, off and on. Before I completely lost my mind I looked on the Internet some and saw "airbrush medium". I'm thinking about getting some of this after work today. Any advice; is this a good idea, any brand in particular, dilution mix? *note the full on interrogation*. :encouragement:

I'd hate to have to buy the pre mixed airbrush paints, considering how much acrylic I have just sitting there taunting me in my art room ...!

Thanks !
 
Wow, Thanks Mitch, my theory was honestly just a guess, but I've practised this on some of my work mainly for the speed with success (sometimes lol) So I don't have to pick up my pointy hat from the cleaners just yet?@Tufty, NA NA NA NAAA NA!!!, sorry a little jealousy creeping in there, I really must keep that under control, lol I'm not fully understanding the airbrush language just yet, but I'll continue looking over shoulders for a while.
Now now class bully lol. Um by blended dagger stroke do you mean dagger stroke at an angle? Or multi pass dagger stroke? Its just the dagger stroke had was at an angle, granted the heights all to hell. Lol
 
Now now class bully lol. Um by blended dagger stroke do you mean dagger stroke at an angle? Or multi pass dagger stroke? Its just the dagger stroke had was at an angle, granted the heights all to hell. Lol

Yes, using an extreme angle while performing your dagger stroke will induce a blend and dagger stroke at the same time, or a blended dagger stroke, as AT said two effects in one pass, it's something you would need to just practice, but don't do it yet, we have to begin simple to start with therefore one effect and then the other.

I've done it at different heights and intensities depending on what I was after, it seems to work for me, but again as AT says for some it might be a little complicated, each of us has something we find easy, I particularly love the figure 8 texture because you can do so much with it, but some guys find it difficult.

I think from Mitch's answer to my question, the plan is to begin with the basics and then later creating quicker and more realistic effects by combining two or more effects on one easy action.

I'll watch how you guys are interpreting the language and then I'll have a go the exercises posted so far to see if I'm getting it, but it's becoming very informative.
 
Status
Not open for further replies.
Back
Top