New Project: H&S Evolution meets tree frog

DaveG

Airbush Analyst
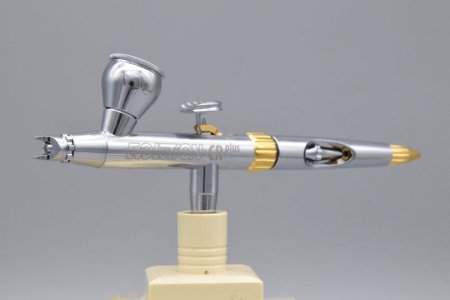
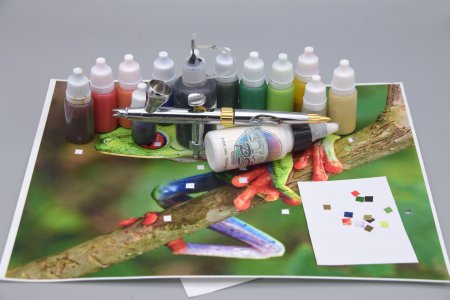
I got in the new Harder and Steenbeck Evolution 2024. I figure the best way to really get to know the brush is simply to use it the way it was meant to be used.
Evolution CR 2024-1.jpg

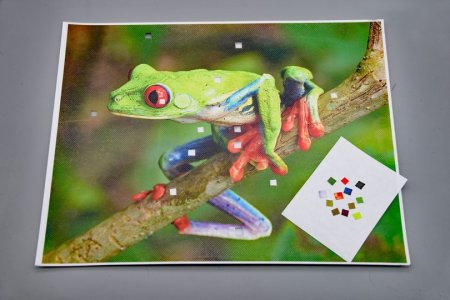
I did a google search, and decided on a Red-Eyed Tree Frog. I printed a full color 11"x14" reference photo, as well as a smaller (8.5"x11") print. I like to pre-mix many of the key colors that I will use in the illustration. To help with the process, I cut windows into a color image, mix my colors and paint full strength swatches. I place the swatches under the image, and check the color through the window - when you get them right, the window pretty much disappears. This is part of the technique(s) I learned from using Dru Blair's Classroom in a box "color theory". I will continue to build color and depth in the illustration itself. Having the majority of the base colors pre-mixed allows me to get into the meat of the work faster and more accurately (provided I did my job mixing).
tree frog color match1.jpg
tree frog color match2.jpg

I will be working on a piece of fine weave canvas (11"x14") that I gave two light coats of gesso followed by a few good sealing coats of Createx UVLS clear. Still shows a good canvas texture while preparing the surface for some after application paint manipulation without damaging the weave of the fabric.

I'll add to the thread as I make progress...
 
Looking forward to seeing this come together. Very interesting your swatching technique and to see the quantities you have mixed.

I must admit, although I have seen the adverts for the new evolution and they look nice and H and S have a good reputation, I do not know much about it. what kind of set up does it come as?

Are there things you like to do with your brushes new out of the box before you use them? Such as are you going to adust the spring weights before you start or keep it standard until you are more familiar with it? What do you check?
 
Nice brush, and the CR+ is chrome right? rather than just nickel which puts me off their other brushes a bit.

Cool technique with the swatches. Looking forward to following along.
 
Nice brush, and the CR+ is chrome right? rather than just nickel which puts me off their other brushes a bit.

Cool technique with the swatches. Looking forward to following along.
yes, Chrome finish.

I learned so much from doing Blair's Classroom in a box on color theory, that it changed the way I work. I thought I was pretty good with color before, but "wow" is all I can say. I had my doubts, but when you can see the "windows" disappear before your eyes, you know there is something to it.
 
I must admit, although I have seen the adverts for the new evolution and they look nice and H and S have a good reputation, I do not know much about it. what kind of set up does it come as?

Are there things you like to do with your brushes new out of the box before you use them? Such as are you going to adust the spring weights before you start or keep it standard until you are more familiar with it? What do you check?
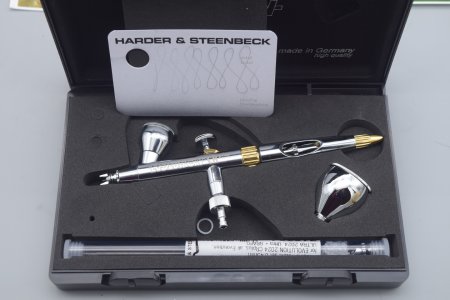
I will eventually make a separate post on the Evolution 2024, but will answer your questions here, too. Harder and Steenbeck brushes are certainly among the best made brushes out there. No corners are cut anywhere. Now, they may not fit everyone's own personal preferences, but it won't be due to build quality. This one is the Evolution 2 in 1, so it came packaged with setup as a (new) .28, but also has a complete (new) .45 conversion setup in the case. Needle, nozzle, and nozzle cap, along with both a 2cc and a 5cc screw on color cups.

DSC_3638.jpg

When I purchase a new brush I just take it out of the package and spray water through it. Provided the water comes out, I then load a sample of paint and start spraying. I generally use E'tac opaque black mixed with condition-air, and a touch of 2050 additive as my go-to test sample. I keep a dropper bottle of it mixed up on my desk virtually all the time. I just do scrap paper(s) full of squiggles, lines, and dots to get a feel for the trigger, and capabilities of the brush as it comes out of the box. Having done quiet a few, you develop a good sense for what the brush is capable of pretty quick.
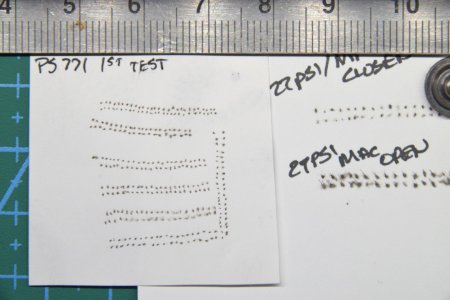
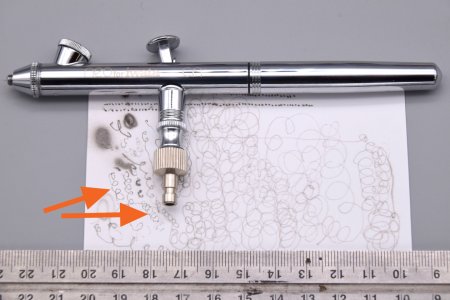
Now, this next part is something not many people take the time to learn - I like to use the trigger to regulate air flow. I spend the time working with the brush to develop a feel for the trigger enough to get the brush to initiate paint flow by drawing the needle back with trigger down, and once I get a dot I will ease up on the trigger enough to slow the air down with out stopping it. Just enough to stop paint flow - then depress it again to start again to produce just a dot. So, on most of my test papers you will see rows and rows of little dots as I develop a feel for the trigger. Not every brush wants to work this way, as some will feel much more like an on/off switch with air. If I can't get comfortable with the action, I will generally switch to a softer air valve spring. Not super soft, because I still like to feel feedback at the trigger, but soft enough to allow it some action without being overly stiff. Some typical doodle sheets -

DSC_7647.jpg
Line-tests1-Neo.jpg

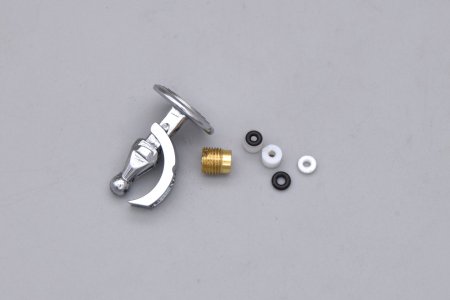
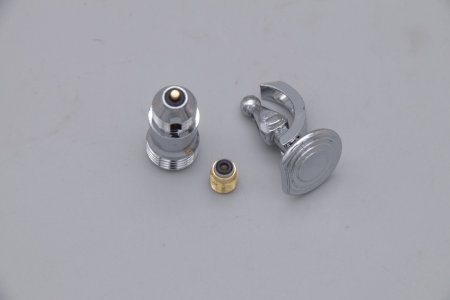
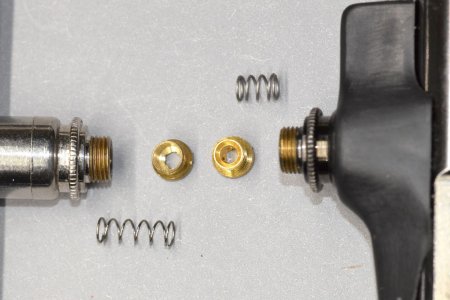
After working with the Evolution for a while, I decided to tweak it to suit my own personal tastes a little more. Completely unnecessary but because I can - I am not a fan of the way Teflon seals feel in a brush. They can add the feel of unwanted drag to the trigger and action that is impossible to adjust out and still keep a good seal where needed. As part of an ongoing project, I had some O-ring seals made out of FFKM to replace Teflon. It is a soft rubber like material that keeps all the same chemical resistance properties of Teflon, but the feel of rubber. I made a delrin cup to replace the teflon in the needle packing and act as a holder for an FFKM75 O-ring. I also replaced the teflon seal at the top of the air valve with an O-ring to improve the feel of the trigger (the parts pictured here are from my H&S Ultra 2024). Changing the seal allowed me to then install softer springs that would not have worked with the teflon seals in place. These minor changes make the brush really super soft and comfortable to use.

DSC_3460.jpg
DSC_3461.jpg
 
I will eventually make a separate post on the Evolution 2024, but will answer your questions here, too. Harder and Steenbeck brushes are certainly among the best made brushes out there. No corners are cut anywhere. Now, they may not fit everyone's own personal preferences, but it won't be due to build quality. This one is the Evolution 2 in 1, so it came packaged with setup as a (new) .28, but also has a complete (new) .45 conversion setup in the case. Needle, nozzle, and nozzle cap, along with both a 2cc and a 5cc screw on color cups.

View attachment 87272

When I purchase a new brush I just take it out of the package and spray water through it. Provided the water comes out, I then load a sample of paint and start spraying. I generally use E'tac opaque black mixed with condition-air, and a touch of 2050 additive as my go-to test sample. I keep a dropper bottle of it mixed up on my desk virtually all the time. I just do scrap paper(s) full of squiggles, lines, and dots to get a feel for the trigger, and capabilities of the brush as it comes out of the box. Having done quiet a few, you develop a good sense for what the brush is capable of pretty quick.
Now, this next part is something not many people take the time to learn - I like to use the trigger to regulate air flow. I spend the time working with the brush to develop a feel for the trigger enough to get the brush to initiate paint flow by drawing the needle back with trigger down, and once I get a dot I will ease up on the trigger enough to slow the air down with out stopping it. Just enough to stop paint flow - then depress it again to start again to produce just a dot. So, on most of my test papers you will see rows and rows of little dots as I develop a feel for the trigger. Not every brush wants to work this way, as some will feel much more like an on/off switch with air. If I can't get comfortable with the action, I will generally switch to a softer air valve spring. Not super soft, because I still like to feel feedback at the trigger, but soft enough to allow it some action without being overly stiff. Some typical doodle sheets -

View attachment 87275
View attachment 87276

After working with the Evolution for a while, I decided to tweak it to suit my own personal tastes a little more. Completely unnecessary but because I can - I am not a fan of the way Teflon seals feel in a brush. They can add the feel of unwanted drag to the trigger and action that is impossible to adjust out and still keep a good seal where needed. As part of an ongoing project, I had some O-ring seals made out of FFKM to replace Teflon. It is a soft rubber like material that keeps all the same chemical resistance properties of Teflon, but the feel of rubber. I made a delrin cup to replace the teflon in the needle packing and act as a holder for an FFKM75 O-ring. I also replaced the teflon seal at the top of the air valve with an O-ring to improve the feel of the trigger (the parts pictured here are from my H&S Ultra 2024). Changing the seal allowed me to then install softer springs that would not have worked with the teflon seals in place. These minor changes make the brush really super soft and comfortable to use.

View attachment 87273
View attachment 87274
Thankyou for spending the time to write that up, it raised plenty of questions about my approach to airbrushing. I will take as much into consideration as I can when I pick my brush up next. It will all take a while to sink in and a few more reads!

I had seen the rows of dots before and wondered why there were so many, I can understand why now. I will also pay more attention to getting the feel for the air valves! As you say some air valve assemblies feel more on/off which I have experienced.

I am not sure how I feel about teflon either, the stress on the threads compressing teflon worried me when I put a teflon needle seal/bearing in the old sprite major I have.

I look forward to the evolution 2024 thread too.
 
Thanks for the information Dave, looking forward to seeing your artwork come to life and learning from your process
 
Thankyou for spending the time to write that up, it raised plenty of questions about my approach to airbrushing. I will take as much into consideration as I can when I pick my brush up next. It will all take a while to sink in and a few more reads!

I had seen the rows of dots before and wondered why there were so many, I can understand why now. I will also pay more attention to getting the feel for the air valves! As you say some air valve assemblies feel more on/off which I have experienced.

I am not sure how I feel about teflon either, the stress on the threads compressing teflon worried me when I put a teflon needle seal/bearing in the old sprite major I have.

I look forward to the evolution 2024 thread too.
I can't remember, but there is a chance that the air valves on the Badgers I sent your son may have been modified. If the retaining screws are cupped towards the bottom to allow the spring to fit into it, they are modified and use a softer spring. If they are almost flat at the top, with no spring pocket, they are stock... It always puzzled me why the TC Model A trigger could be so nice when compared to the Badger. Modified on the left, stock on the right -

badger trigger mod1.jpg
 
I can't remember, but there is a chance that the air valves on the Badgers I sent your son may have been modified. If the retaining screws are cupped towards the bottom to allow the spring to fit into it, they are modified and use a softer spring. If they are almost flat at the top, with no spring pocket, they are stock... It always puzzled me why the TC Model A trigger could be so nice when compared to the Badger. Modified on the left, stock on the right -

View attachment 87277
I will take a look! The thought had not entered my mind they may have some of your mods!
 
Back
Top