Really Stupid Question

D

Dagobarbz

Guest
I charged into this repainting my bike project totally blind as far as what to expect. Now I have the paint gun, a Master compressor that came with my airbrushes, everything is ready to spray primer.

So the airbrush hose doesn't fit the little airgun. I got an adaptor that was 1/2" down to 1/4" to fit the airbrush hose. (It's a little detail airgun, runs on 50 psi. My compressor can do this.)

So now, where the hose connects to the 1/4" adaptor, it leaks air. I guess I need an actual paint gun hose and have no idea if I can even get one with a 1/4" end and a 1/2" end.

Dixieline and Home Depot no have, and the local "airbrush stores" are just art stores with a few airbrush bits, none of which include adaptors or hoses. Just airbrushes and owl stencils.

So, of course I came here. It's less embarrassing than looking like an idiot at the hardware store again.
 
I assume its the tail and snap connector leaking? Or is it the main screw in type fitting, could just be that you need some teflon tape and add some to the threads, if its a snap connector that is leaking its buggered and may need replaced. most hardwares don't stock fittings that small and sounds like you may need a reducing bush, if your hardware doesn't stock such they generally can be easily found on ebay or online airbrush store. Most airhoses you buy off the shelf are for 1/4 or 1/2 inch BSP and need reduced generally to 1/8 BSP (iwata ad 5 mm for badger), its the reducing bushes that generally are a bit harder to find as usually most air driven tools are not that small in flow, badger specific adaptors are available but not in hardwares generally. Can post some links if you still find it difficult but to be on the same page or for others to assist, post a pic of your hose and any connections your having issue with, there are lots of options that will get you going pretty quick..Good luck
 
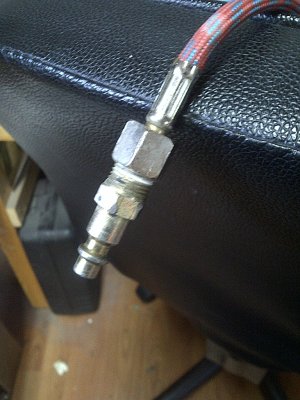
I suspect the first, but I have no idea what a 'tail and snap connector' is. The 1/4" ends of the hose are identical and there's the threaded ring that slides up and down the assemblage a bit and there is an o-ring in there. So I screwed the brass adaptor onto the little detail paint gun, and screwed the airbrush hose to it and air comes out, not on the gun side of the adaptor, but the hose side because that thing slides. Do you think teflon tape would work, or should I just man up and buy a damn paint gun hose? (I know the answer. Buy a damn paint gun hose. Right?)
 
the 'snap' fittings are like a lot of garden hose fittings where the hose 'snaps' onto the garden tap.
As rebel has said, pictures will do a lot to help,
 
It may also be the threads... yes pictures. Did you use any thread tape?
 
You can get a range of adaptors and quick connects for various sizes in europe, so I'm sure you can get the equivalent in your part of the world, but pics will help see exactly what you need.
 
If the end that "slides" still moves, the adapter is not deep enough to seal this. It should tighten so there is no movement, therefore sealing....
best I can tell by your description of whats happening
Cheers
 
If the end that "slides" still moves, the adapter is not deep enough to seal this. It should tighten so there is no movement, therefore sealing....
best I can tell by your description of whats happening
Cheers

That's exactly the problem.
So, I am going to rent an appropriate compressor and hose and be done with this nonsense! (it's only for the primer, basecoat and clearcoat. All else shall be airbrush.)
 
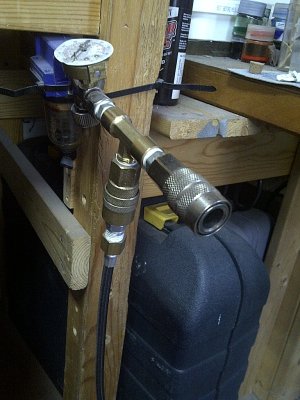
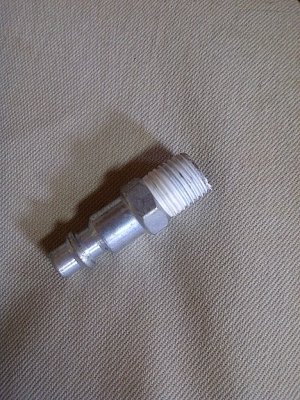
I dont think you need to rent one. Go to home depot and get the following fittings. They are the 1/4 im. These work on both of my a/b hoses and my paint guns.IMG-20150905-03311.jpgIMG-20150905-03312.jpg IMG-20150905-03313.jpg
I just use these and it works for me. I have a air adjuster and a tee at my table to use both brushes.
Hope this helps.
 
I use similar stuff, the 1/4 are aro fittings. Common enough they should be easily available.
 
You do get different standards for 1/4" fittings. I use German spec but I know you get universal and a few others as well. Not all are compatible with each other.
 
Now I am the proud owner of a 3 gallon compressor and hose. Problem solved, shoulda done this to begin with. Thanks for the advice, is that teflon tape on the fitting?

Oh, and of course the thing got here yesterday when high winds and rain from hurricane Linda scooted through the county, making the "well ventilated" garage into a wind tunnel.

So I thought, "High wind, rain, and spray paint. What could go right?"

Nothing, I thought. So I went and had some beer instead. I could see frustration on the horizon. Maybe this afternoon, if it warms up/dries out some.
 
Last edited by a moderator:
and if you can do the fitting up by hand you don't have enough on!! :)

LOL good to know! I spent a good part of the day reading the manual and tinkering. Yep, I got the compressor working and the gun working and the pressure valves and gauges figured out.

The dumb thing about the bleeder valve is they say put on eye protection and block the air from your face with your hand. So I thought, why not just pull the ring from the other side of the tank instead of sticking my face right there in front? Well, that works just fine and makes a horrendous hissing noise, like a bushel of angry snakes.

Manuals these days are so minimal, but everything's doing what it's supposed to do, so tomorrow I prime the bits. Side covers first (because who cares) and tank last.

After I got everything working as advertised, I shut it all down and went out on the downstairs patio to have a beer. And I'm sitting there feeling all pleased and competent with my bad self, and TWOK! Something hit the pavement. Damn, it's raining dying finches! Well, just one, but that's kind of suck. If I were superstitious, I'd say it's an omen.

But I'm not, so tomorrow we prime!
 
When I bleed the pressure off I hold the hose end partially in then use the drain valve on the bottom of the tank to finish it off and drain any liquid. The release valve is waaaay too noisy!!
 
When I bleed the pressure off I hold the hose end partially in then use the drain valve on the bottom of the tank to finish it off and drain any liquid. The release valve is waaaay too noisy!!

For sure, I'm gonna wear earplugs for the job. That thing makes a racket. The manual says not to use the drain valve if the tank holds more than 10 psi, so I guess reading the manual has some value. :)

I didn't know if the shut off valve for the tank was working so I started it and went outside in case it blew up. I'm not gonna be one of those stupid news clips!
 
Ahh the joys of air compressors !
I always empty the tank before hitting the pressure/drain valve, the quicker that noise is over and done with the better
 
Well, ladies and germs, I have primed the tank, side covers, fender and seat frame. It looks a lot better than the rattlecan job I did last year. Paint gun and compressor, no problems.

I scared a neighbor lady, she was startled by the gas mask. Heh.

I'll let that set overnight, then I'll lightly sand it and then...that beautiful Viper Violet. I'm glad the primer is Step One. Didn't even screw that up a bit, so I feel confident about the base coat application.

Then...the fun starts! Pearls and candies! Wheeee!
 
Good work, looking forward to seeing the progress. I love it when a plan comes together... :)
 
Back
Top