airbrushtutor
Love Spreading Overseer
Hey everyone!
I'm trying to challenge myself more and more and while i'm definitely seeing improvement the more i practise, I'm still growing and i still see alot of room for growth in terms of my speed and accuracy/ understanding of an image. It's amazing how much you can keep learning!
Here's the latest:
total time is an estimated 16 hours including color mixing, mainly using createx illustration colours on cold press illustration board (unknown type).
1. Laying down the foundation.
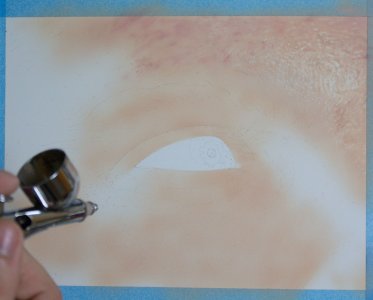
The first step after organising my plan of attack is to mix the base colour. This is the color I identify as the second lightest in the image, the lightest being the 'white' erased textures.
I go ahead and mix the colour, then apply it very roughly, however generously in areas where there is little texture and a little more lightly where I'm going to have to build up textures. I apply it more lightly in the textured areas as i will likely make 2 passes to create more realism and to create a texture layer.
2. Adding the second layer.
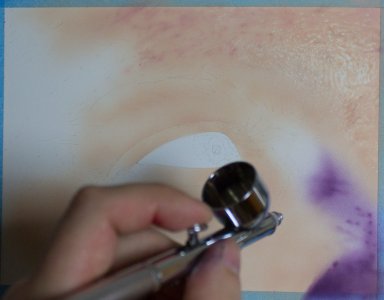
Again this color was matched to 99%. Thankfully with alot of recent practise my color matching is becoming alot faster, matching a color like this to 99% in a matter of about 15 mins as opposed to 4 hours!
You'll notice that i haven't laid much of the base color down over this area as this layer requires erasing as well. Since the board is not 100% suitable for erasing, i need to take precautions such as this because the illustration board will allow me 1 good pass at creating textures, a rough 2nd pass and a poor 3rd pass (as the board will start to tear up).
3. Creating realism with fine textures.
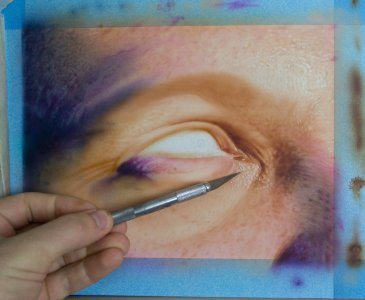
Hear you can clearly see that i'm using a scalpel blade to create the finer textures. I notice a massive difference from the first time i attempted textures such as these to now, my control of the blade has improved, my understanding of the textures and my execution of it. Admittedly there's still room for improvement, but that's what keeps me interested in this art form!
I don't only use the sharp edge of the blade, i also find that the back edge of the blade is perhaps more aggressive and at times more forgiving than the sharp edge!
4. The iris.
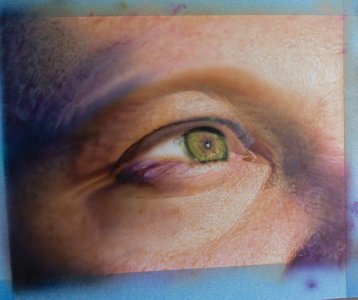
Done in 3 stages, i had originally masked out the inner section of the eye, to give me a white base to work from. Since then, i've lifted that frisket, then masked around the iris. I study the iris carefully and find that i have two colors that seem opaque and less saturated, while i can also see a bright orange/ yellow in there which i'll use straight transparents and a mixture of care to create! The brighter the colours will generally be easier to create accurately with a straight transparent.
4.5 The eye ball.
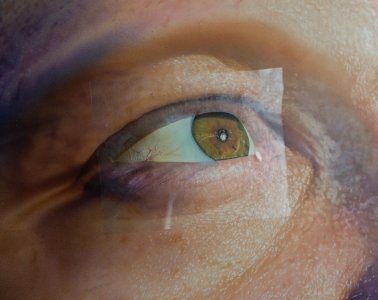
Here I've matched the colour of the white of the eye, you may notice here that it was quite a bit of green influence! I was a bit surprised to see this. Trust what you see on your reference, not what you feel should be there. The left side of the eyeball has some tiny red veins. I took my time with some carefully placed frisket and airbrushed those in. did them too dark - they're probably only around 20% intensity. i did about 80%. Had to erase them out somewhat and then i've used a burnt umber to subtly color the left side of the eye, with some violet influence also.
5. Airbrushing the fine hairs.
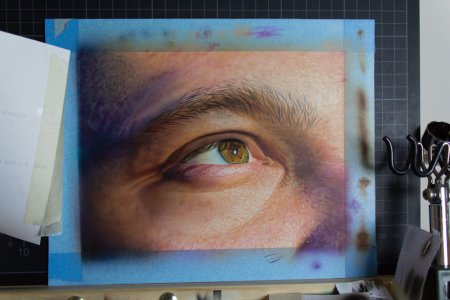
These required alot of patience. I made a couple of small paper stencils and checked them first to see that i had an accurate size of eyebrow hair. I made some fine, some shorter, some longer etc. A variety of hairs on the one little stencil. I went over and over, carefully checking the reference and creating each individual hair!
Once there were enough hairs and enough paint on the page, i highlighted these areas using the scalpel blade. It wasn't a guess, i worked closely with the reference and built up the areas to how i saw them on the reference!
6. Finished piece.
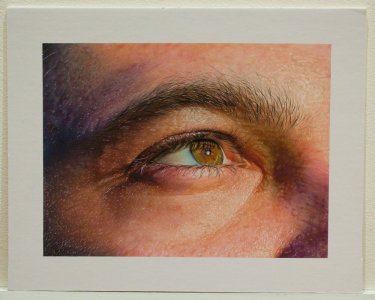
The eyelashes were added using the same stencil and a couple more curved hairs. The eyelashes could have been done a little darker in some places and i should have been more careful with the reference, as it was getting towards the end of the artwork i find i rush things alot more and lose patience. Don't do this if you want a good result.
The final stage was to add all of the smaller, finer detailed hairs using a scalpel blade, the front edge, back edges and bottom edge of the blade. i took great care with the intensity that i used in creating these textures based on the reference.
I'm really happy with the finished result, can definitely see and improvement and will definitely learn from the mistakes made in this piece! I think this is the best work I have done to date and from an original photo also!
I'm trying to challenge myself more and more and while i'm definitely seeing improvement the more i practise, I'm still growing and i still see alot of room for growth in terms of my speed and accuracy/ understanding of an image. It's amazing how much you can keep learning!
Here's the latest:
total time is an estimated 16 hours including color mixing, mainly using createx illustration colours on cold press illustration board (unknown type).
1. Laying down the foundation.

The first step after organising my plan of attack is to mix the base colour. This is the color I identify as the second lightest in the image, the lightest being the 'white' erased textures.
I go ahead and mix the colour, then apply it very roughly, however generously in areas where there is little texture and a little more lightly where I'm going to have to build up textures. I apply it more lightly in the textured areas as i will likely make 2 passes to create more realism and to create a texture layer.
2. Adding the second layer.

Again this color was matched to 99%. Thankfully with alot of recent practise my color matching is becoming alot faster, matching a color like this to 99% in a matter of about 15 mins as opposed to 4 hours!
You'll notice that i haven't laid much of the base color down over this area as this layer requires erasing as well. Since the board is not 100% suitable for erasing, i need to take precautions such as this because the illustration board will allow me 1 good pass at creating textures, a rough 2nd pass and a poor 3rd pass (as the board will start to tear up).
3. Creating realism with fine textures.

Hear you can clearly see that i'm using a scalpel blade to create the finer textures. I notice a massive difference from the first time i attempted textures such as these to now, my control of the blade has improved, my understanding of the textures and my execution of it. Admittedly there's still room for improvement, but that's what keeps me interested in this art form!
I don't only use the sharp edge of the blade, i also find that the back edge of the blade is perhaps more aggressive and at times more forgiving than the sharp edge!
4. The iris.

Done in 3 stages, i had originally masked out the inner section of the eye, to give me a white base to work from. Since then, i've lifted that frisket, then masked around the iris. I study the iris carefully and find that i have two colors that seem opaque and less saturated, while i can also see a bright orange/ yellow in there which i'll use straight transparents and a mixture of care to create! The brighter the colours will generally be easier to create accurately with a straight transparent.
4.5 The eye ball.

Here I've matched the colour of the white of the eye, you may notice here that it was quite a bit of green influence! I was a bit surprised to see this. Trust what you see on your reference, not what you feel should be there. The left side of the eyeball has some tiny red veins. I took my time with some carefully placed frisket and airbrushed those in. did them too dark - they're probably only around 20% intensity. i did about 80%. Had to erase them out somewhat and then i've used a burnt umber to subtly color the left side of the eye, with some violet influence also.
5. Airbrushing the fine hairs.

These required alot of patience. I made a couple of small paper stencils and checked them first to see that i had an accurate size of eyebrow hair. I made some fine, some shorter, some longer etc. A variety of hairs on the one little stencil. I went over and over, carefully checking the reference and creating each individual hair!
Once there were enough hairs and enough paint on the page, i highlighted these areas using the scalpel blade. It wasn't a guess, i worked closely with the reference and built up the areas to how i saw them on the reference!
6. Finished piece.

The eyelashes were added using the same stencil and a couple more curved hairs. The eyelashes could have been done a little darker in some places and i should have been more careful with the reference, as it was getting towards the end of the artwork i find i rush things alot more and lose patience. Don't do this if you want a good result.
The final stage was to add all of the smaller, finer detailed hairs using a scalpel blade, the front edge, back edges and bottom edge of the blade. i took great care with the intensity that i used in creating these textures based on the reference.
I'm really happy with the finished result, can definitely see and improvement and will definitely learn from the mistakes made in this piece! I think this is the best work I have done to date and from an original photo also!
