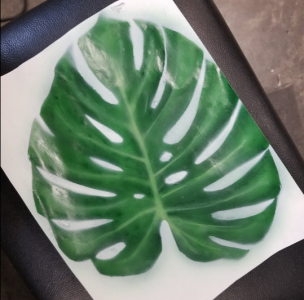
Shorti
Double Actioner
Alright, so I read a bit here and there but still unsure of what I should try to correct my issues.
As mentioned here:
https://www.airbrushforum.org/threads/hello-friends.23336/#post-360199
I have the following airbrushes:
Badger 200NH bottom feed
Master G79 gravity fed, dual action
I am working with metal and am preparing to add some details to the project I showed in
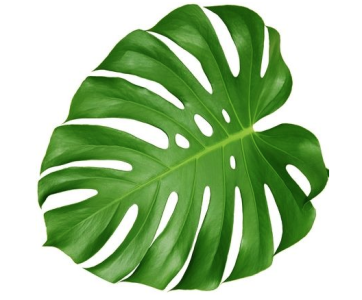
the link above. I am going to add the veins and shadows to the leaves. Here is what I'd like
to achieve:
So, I watched some Youtube videos and one of them explained how you should get really close to the
"canvas" to create fine lines and that is what I've been practicing.
I also watched another Youtube video about how to use enamel paint that can be purchased
at your local hardware store. I thought this was a great idea especially if the project
is big. I plan to do a lot of plant type projects so buying larger quantities of green
paint made sense..and plus, these 'plants' are going to be sitting outside so I needed
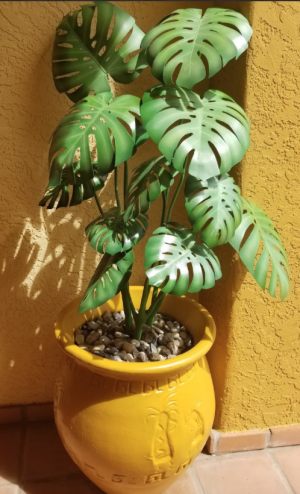
exterior paint anyway. So, I bought a couple of shades of Behr enamel paint. That is what
I used as the base on the Monstera plant in the picture. That spray went pretty well and
I was pretty happy with the guns.
Now I want to add the detail. Instead of having a quart of all these colors sitting around
I decided to use regular airbrush paint (if there is such a thing). Since I was ordering parts
from Badger (US Airbrush) I order some Minitaire paint. I first practiced with my "regular"
needle/nozzle...the one that came with the guns. I don't see where it tells me what size it is.
I tried this with both guns just in case one worked better for this more close-up work. On the
Badger, I only had the one setting I could change, which was both air/paint mixture. I messed around
with this for an hour trying to dial it in. Basically, when I dialed it down and tried to spray I
would get a little paint (an inch) and then it plugged up. I would try to open it up a bit and
would just get a larger amount of paint (not the fine line I was looking for). I thought maybe the
Minitaire paint was just too thick (although it says its ready to use) to dial it down to a fine line
so I added water. That was no real improvement and just caused more splatter. I still gummed up
when I closed the setting and would get lines that were too large when I opened it up.
So, I switched to the Master wondering if the Badger just wasn't good for this kind of fine detail
but I got the same results. Then I thought I might try using the
enamel paint instead of the Minitaire (maybe the paint isn't good for this type of operation).
Still the same result. After playing with the settings on the Master I finally gave up and went back
to the Badger because I did have a "41-044 P.P.S. Super Detail Conversion" kit that I purchased.
I put that in the gun and the fine lines were definitely better. However, instead of gumming up after
only laying down 1 inch of a line it gummed up after about 3 inches. So, I played around with the setting
for another hour but couldn't improve the issue. Basically, what I had to do is spray 3 inches of line
then clean the tip; spray 3 inches of line then clean the tip, etc. Here's what I did:
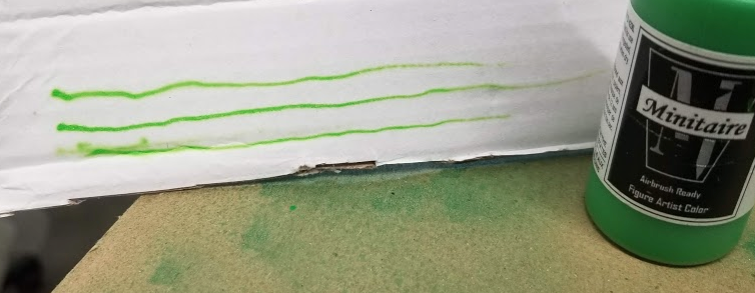
Each of those lines it stops spraying paint and I clean the nozzle then start the next line.
Second issue...when I spray on a piece of cardboard it looked decent but when I sprayed on a piece of metal
I get what I believe is called spidering. So, according to a post it says I may have too much air pressure.
I am using my big air compressor for this and had the regulator set at 30 psi. I turned it down to ~15psi and
saw a little improvement on the spidering. I didn't see any improvement on the amount of paint I spray
before I have to clog the tip. I tried reducing the air a little more but, since this compressor is made
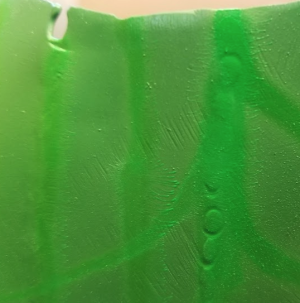
for big tools its hard to tell what the pressure is. In this image you can see a lot of splatter on the line on
the right side...it did improve as I was dialing in but still splatter on the far left line. At that point I
was having issue's getting enough paint out of the gun:
Is there a certain psi I should expect to use for this finer details. Is there a cheat-sheet on when to use
what pressure?
Should I purchase some sort of an in-line pressure regulator that will allow me to more precisely dial in
air pressure to a lower pressure? Is so, any recommendations?
I started watching one of the video's on your site that talked about the different airbrushes and found that
the Badger bottom feed is probably best for covering large area and not so good at the fine detail so it
sounds like I should focus on getting the Master dual action working for this kind of work.
When I was using the Master I was playing around with the air flow knob on it...that got me thinking of why
would I need another inline regulator since I can fine tune it at the airbrush. However, when I was trying
to do this I would dial the air down and it would just stop spraying..I crank it up little by little and suddenly
it just explodes with paint...I adjust it back down a little and it stops spraying...I clean the top and start
cranking it up again until it explodes with paint...I crank it back down and start over..../sigh very frustrating.
So...maybe some pointers and tips would be helpful! Still have a lot to read on this forum...great stuff!
As mentioned here:
https://www.airbrushforum.org/threads/hello-friends.23336/#post-360199
I have the following airbrushes:
Badger 200NH bottom feed
Master G79 gravity fed, dual action
I am working with metal and am preparing to add some details to the project I showed in
the link above. I am going to add the veins and shadows to the leaves. Here is what I'd like
to achieve:

So, I watched some Youtube videos and one of them explained how you should get really close to the
"canvas" to create fine lines and that is what I've been practicing.
I also watched another Youtube video about how to use enamel paint that can be purchased
at your local hardware store. I thought this was a great idea especially if the project
is big. I plan to do a lot of plant type projects so buying larger quantities of green
paint made sense..and plus, these 'plants' are going to be sitting outside so I needed
exterior paint anyway. So, I bought a couple of shades of Behr enamel paint. That is what
I used as the base on the Monstera plant in the picture. That spray went pretty well and
I was pretty happy with the guns.
Now I want to add the detail. Instead of having a quart of all these colors sitting around
I decided to use regular airbrush paint (if there is such a thing). Since I was ordering parts
from Badger (US Airbrush) I order some Minitaire paint. I first practiced with my "regular"
needle/nozzle...the one that came with the guns. I don't see where it tells me what size it is.
I tried this with both guns just in case one worked better for this more close-up work. On the
Badger, I only had the one setting I could change, which was both air/paint mixture. I messed around
with this for an hour trying to dial it in. Basically, when I dialed it down and tried to spray I
would get a little paint (an inch) and then it plugged up. I would try to open it up a bit and
would just get a larger amount of paint (not the fine line I was looking for). I thought maybe the
Minitaire paint was just too thick (although it says its ready to use) to dial it down to a fine line
so I added water. That was no real improvement and just caused more splatter. I still gummed up
when I closed the setting and would get lines that were too large when I opened it up.
So, I switched to the Master wondering if the Badger just wasn't good for this kind of fine detail
but I got the same results. Then I thought I might try using the
enamel paint instead of the Minitaire (maybe the paint isn't good for this type of operation).
Still the same result. After playing with the settings on the Master I finally gave up and went back
to the Badger because I did have a "41-044 P.P.S. Super Detail Conversion" kit that I purchased.
I put that in the gun and the fine lines were definitely better. However, instead of gumming up after
only laying down 1 inch of a line it gummed up after about 3 inches. So, I played around with the setting
for another hour but couldn't improve the issue. Basically, what I had to do is spray 3 inches of line
then clean the tip; spray 3 inches of line then clean the tip, etc. Here's what I did:

Each of those lines it stops spraying paint and I clean the nozzle then start the next line.
Second issue...when I spray on a piece of cardboard it looked decent but when I sprayed on a piece of metal
I get what I believe is called spidering. So, according to a post it says I may have too much air pressure.
I am using my big air compressor for this and had the regulator set at 30 psi. I turned it down to ~15psi and
saw a little improvement on the spidering. I didn't see any improvement on the amount of paint I spray
before I have to clog the tip. I tried reducing the air a little more but, since this compressor is made
for big tools its hard to tell what the pressure is. In this image you can see a lot of splatter on the line on
the right side...it did improve as I was dialing in but still splatter on the far left line. At that point I
was having issue's getting enough paint out of the gun:

Is there a certain psi I should expect to use for this finer details. Is there a cheat-sheet on when to use
what pressure?
Should I purchase some sort of an in-line pressure regulator that will allow me to more precisely dial in
air pressure to a lower pressure? Is so, any recommendations?
I started watching one of the video's on your site that talked about the different airbrushes and found that
the Badger bottom feed is probably best for covering large area and not so good at the fine detail so it
sounds like I should focus on getting the Master dual action working for this kind of work.
When I was using the Master I was playing around with the air flow knob on it...that got me thinking of why
would I need another inline regulator since I can fine tune it at the airbrush. However, when I was trying
to do this I would dial the air down and it would just stop spraying..I crank it up little by little and suddenly
it just explodes with paint...I adjust it back down a little and it stops spraying...I clean the top and start
cranking it up again until it explodes with paint...I crank it back down and start over..../sigh very frustrating.
So...maybe some pointers and tips would be helpful! Still have a lot to read on this forum...great stuff!

