Correcting mistakes....

sevastra

Needle-chuck Ninja
So I'm working with a bent needle, it shoots just right of where I am intending to put paint ,I don't have the spare money right now for a new one. But, sometimes i forget its bent, and i mess stuff up A LOT.

I have a few round about question, just for general ideas of what you guys do to fix stuff like:
over shading
a section of a spider-line or wobbly little line

Also, this big one which is driving me insane, Erasing. I swear, every time i use an eraser to highlight, i can't get a good texture out of it. Its a sudden highlight, that rips with the area, no matter what i'm painting on. I don't know why i keep using the new Helix, i can't stand it, it doesn't do anything for me. Is it anyway to smooth out an area you have erased? It just gets worse. IF anyone has a video out for this kind of thing, or has seen one please let me know. Also scraping/scratching, it need help with that too

I have attached a file with the first layer of a piece i am trying to work on, there's problems all over it so at this point i want to try and use it to see if i can correct mistakes on it and apply it for later pieces, but the section near the edge of the jaw on side of face, and at the nostril the highlight is retarded all over, but the erasing is tearing it up and i'm gently while doing it. I would try to stipple the edges but, clearly i can't erase at all haha i need help. WIN_20141207_121118.JPG
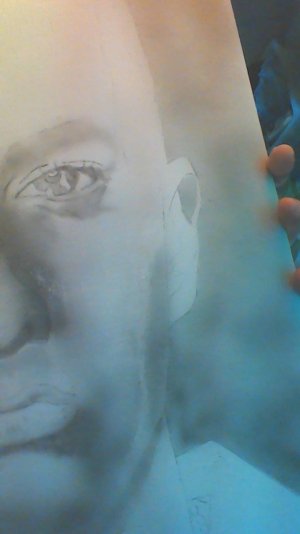
 
Hi sevestra
For your bent needle i do believe mitch has a video on that i could be wrong but had def seen one, for over shading i would erase it back but you say your ripping up your surface, are you letting the paint dry proper before you erase, also what surface are you using, if its just thin paper then you need to be extra careful, as for scratching im only learning myself but if erasing is ripping the surface then forget about scratching, you need a good surface and even then you need to be extra careful,
 
Hi Matty,
I will check out to see if i can find that video . I am probably not waiting long enough to erase, I use to wait, and its like i waited too long and it woudn't come off at all, so now i'm paranoid about it ha. Right now I'm using canson artboard. it says it is for erasing and scratching...i think its lying!

Maybe I'm just using crappy erasers, but I don't think so, I have a faber castell perfection, the dumb helix, some kneading erasers, and its all crap. * throws hands Up!*

I have been in a real funk for months now, everything i do seems like a monkey could do better. I havent been able to finish pieces for people because of it. Maybe its really just me. Inever had to go back and make such huge corrections. i kind of just went about airbrushing like it was a drawing, and placed whatever it was i thought it needed. I have lost my mojo
 
We all lose our mojos mate ive been having a confidence crisis myself lately and have binned the last six things i started before my lion, if you could do it before you can do it again [emoji4]
I havent heard of that surface before but im sure someone on here has used it, i had a discussion the other day on a another thread and after that before i started my lastest i laid down a couple of coats of com-arts varnish before i started to lay paint to help with scratching sort of protect the surface, ive only ever used com-art so cant speak for any other paint
 
eraser techniques are not that hard to learn , but you do need a good surface and paint you can erase with ease even if you leave it to dry . when you try to erase wet paint it will come right off leaving you with an instant high light.
I always use Schoellershammer 4G paper or board and etac efx paints if I want to use eraser techniques
 
Erasing is an art form all its own.
You didn't say what paint you were using. A lot of your problems may stem from this.
Learning to erase "on the go" isn't a good idea. You should practice erasing on the same surface you will be using.

Transparent paints and over-shooting your values is their main drawback. We had a thread on error correction not long ago with ideas in it.
 
Here is a video on how to straighten your needle.
I used a very similar method to straighten mine by just laying the needle on my desk, with the tapered portion flush on the desk, and just rolled the end of the airbrush handle up and down the needle.
 
Oh, sorry. I am using Etac paint.

Thanks for that Helio! I will have to take a day and try and bust something out and just keep going for it.
 
I made a couple of short movies on my phone when i was erasing on a piece (erasor pencil, electrical and fiberglaspen). I had in mind to use them for a tutorial but as i find it nearly impossible to film myself while working they turned out crap so they wern't realy usuable.

It's a bit too much to upload them to my site but if you are interested pm me your mail adres and I'll mail them to you. (but like I said they are crappy so no clue if they will be usefull :))
 
bit hard to suggest any fixes for wobbly lines and such, it really is a control thing and sometimes half an hour warm up on some practice sheets will get your brain re-focused prior to painting a real piece, it may also help your brain remember that your needle is bent, mine are also bent at the moment and fighting me all the way but its just a case of changing distance a bit first, establish your shades and then maybe use a template or freehand shield to assist in placement..On the erasing have you actually tried water color paper, get a medium or light tooth (Roughness) this will help maintain a softer erasing compared to a hard surface as a light rub say with a everyday hand will only soften the shade as the pigment is trapped in all the hills and valleys of the paper, an electric eraser then can be used over the top for more highlighted needs..If anything I think your worrying way to early, do your base shapes, erase into them and even if its harsh refog the shape and then erase again and refog etc etc..Thats layering, when you get good at it you can get to your need faster but in your pic you've barely done a base and are worrying to much how it looks..The base is purely for establishing the depth in the skin you need for later layers, it should be about 9 layers or so to get to the end, less for some, more for others..In other words just keep going :)
 
Thanks rebelair, bossman, hassje, helio, maty and ronald. I think i am over analyzing a lot, probably because everything i've been doing hasn't come out how i wanted it. And admittly i probably could of saved the pieces or worked through it if i stuck with it and didn't pitch a fit about it. ha

when you refog an area, i'm guessing distance is the best way to go no? i got too close on the side of the nose , out of rage
 
The best way to avoid what happened is to thin the paint A LOT more.

Look at some of the step by steps on here. You will see guys are using very thin layers. Barely picked up by the camera.
Then another thin layer, then another. You get the drift.
Don't go blasting stuff in unless you are darn sure about the value.
 
Re-fogging is adding the next layer to your work, shielding areas you dont want darker as you go.
By doing this, you control how dark / light you want areas to get.
The erasing adds textures / highlights etc with each layer.
Slow and steady.
 
Back
Top