I
Inkster
Guest
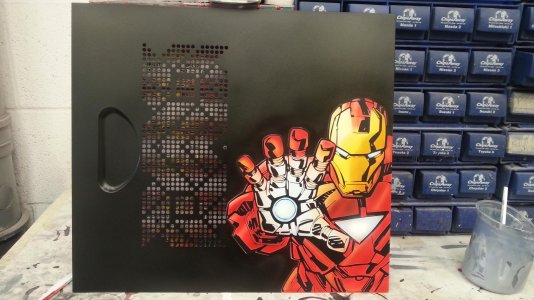
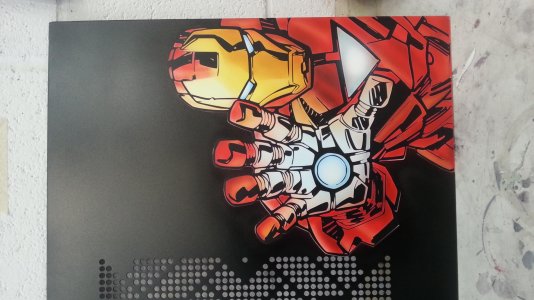
Hey guys i thought i would share my secret for painting marvel characters because i know how achieving those hard solid lines are.
It does take away the airbrushed look but leaves you with a killer looking design.
Now its properly worth mentioning that if you dont have a plotter cutting this is gonna be time consuming and difficult in my opinion but it is possible
Also i have to apologies that i was so into the piece i didnt take pictures of the process so i am gonna explain it as best i can")
This tutorial will seem like it takes forever but it really doesnt unless your plotter goes crazy on you
So to start here is what i used
Material: Aluminium Composite (DIBOND ALT) purchased of ebay for £2.50 A4 sheet
Paints: Wicked, primer, Base coat matt black
Others: Vinyl (ANY COLOUR), transfer tape and a sheet of acetate
Renegade Krome & Patriot
Colours used in this one are
detail scarlet red
opaque red
detail red violet
detail yellow
detail orange
opaque brown
opaque blue
detail black & white
Okay so the image i am gonna show you is hellboy that i painted yesterday

Okay so lets get started
First i found an image on google that i liked and downloaded it.
Then i opened the image in GIMP2 and converted the image into a threshold by clicking the TOOLS tab>COLOR TOOLS>THRESHOLD

Then i found the darkness i wanted making sure all the detail was there

Okay now we got that sorted the next stage is to export the file and open it in inkscape
Once you have done that make sure the picture is selected and click PATH>TRACE BITMAP now in here i set my threshold to 500 and then click update and ok now you can close that box.
Then you can click and drag the top layer off and you will see you have 2 of the same image you need to keep the one that now looks smooth and then save as a .eps file
Now you have that file ready there is one more
Open the image again in GIMP2 (not the threshold one, the original)
now you are gonna get the fine detail you need for i.e the hair so click the rectangle select tool and select the hair and threshold it until your happy the detail is fine and then again with the beard and finally the little hair that peaks out.
it should look like this
View attachment 25113
Cont...
It does take away the airbrushed look but leaves you with a killer looking design.
Now its properly worth mentioning that if you dont have a plotter cutting this is gonna be time consuming and difficult in my opinion but it is possible
Also i have to apologies that i was so into the piece i didnt take pictures of the process so i am gonna explain it as best i can
This tutorial will seem like it takes forever but it really doesnt unless your plotter goes crazy on you
So to start here is what i used
Material: Aluminium Composite (DIBOND ALT) purchased of ebay for £2.50 A4 sheet
Paints: Wicked, primer, Base coat matt black
Others: Vinyl (ANY COLOUR), transfer tape and a sheet of acetate
Renegade Krome & Patriot
Colours used in this one are
detail scarlet red
opaque red
detail red violet
detail yellow
detail orange
opaque brown
opaque blue
detail black & white
Okay so the image i am gonna show you is hellboy that i painted yesterday
Okay so lets get started
First i found an image on google that i liked and downloaded it.
Then i opened the image in GIMP2 and converted the image into a threshold by clicking the TOOLS tab>COLOR TOOLS>THRESHOLD
Then i found the darkness i wanted making sure all the detail was there
Okay now we got that sorted the next stage is to export the file and open it in inkscape
Once you have done that make sure the picture is selected and click PATH>TRACE BITMAP now in here i set my threshold to 500 and then click update and ok now you can close that box.
Then you can click and drag the top layer off and you will see you have 2 of the same image you need to keep the one that now looks smooth and then save as a .eps file
Now you have that file ready there is one more
Open the image again in GIMP2 (not the threshold one, the original)
now you are gonna get the fine detail you need for i.e the hair so click the rectangle select tool and select the hair and threshold it until your happy the detail is fine and then again with the beard and finally the little hair that peaks out.
it should look like this
View attachment 25113
Cont...
Last edited by a moderator: