F
Fallen Airbrushing
Guest
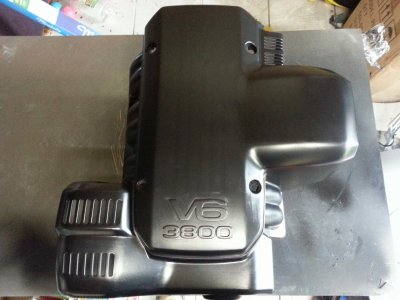
This is my first attempt at something other than practice dagger strokes or black and white skulls. I am painting an engine cover off a VT Holden Commodore. Hope these little step by steps can help other people ") also this is my first ever thread so hopefully i have done it right haha... learn by doing isnt that what they say??
also this is my first ever thread so hopefully i have done it right haha... learn by doing isnt that what they say??

Step 1: Ok so at this point i had sanded it down with 80grit to get rid off old paint and filled the channels in the cover and wording with automotive filler. Then using Auto Air Sealer Dark gave it 4 coats and left it overnight. Step 2: As the title tells what it is the customer sent me a picture of a clown that he wanted on the cover. I printed the picture and cut the face leaving behind the area to paint the face. Going in with Auto Air Transparent White I went in and started freehanding all the details of the face with the white using the cutout as a stencil and application tape as a shield to protect the cover from overspray.

Step 3: I decided to start adding details and shading so mixing Auto Air Trans White and Trans Black to make a light grey mix i began working details into my soon to be dark areas. as you can see the grey is very light but gave me an understanding of where i needed to go darker and also where i needed to keep my highlights.

Step 4: After finishing with the grey shading mixture I decided i wanted to add colour before I began going in darker with shading to make sure my colours dont dirty up and stay and clean as possible. Using Auto Air Trans Red I slowly worked my way around the areas required to be red. making sure i went in deeper in the darker areas to give a sense of depth.

Step 5: I begin going into the dark areas with a 50/50 mix of Auto Air Trans Base and Trans Black trying to not kill the painting in black and going to dark too quickly.

Step 6: after fimishing the black i was happy with the progress of the clown and was trying to figure out if I go with hair like in my ref picture of the clown or make his hair look alive with flames. Flames won... I can honestly say this was the most terrifying part for me as i had never really tried flames so starting off with a mix of Trans White and Trans Cobalt Blue i began laying out the flames and adding detailed licks throughout the flames.
as I missed afew steps of the flames I would go over each layer of blue with Auto Air Candy Purple. Each layer after the purple candy became lighter until i had pure white in my airbrush for final highlights at the hottest part of the flames.

Step 7: as i was having problems uploading images to this thread this is my final step but i will also go back over and explain step 6 some more.. so as you can see with the multiple layers of Transparents and Candy Purple I tried to get a sense of depth and intensity but i also didnt want it to look plain I wanted it wild and crazy..... just like my clown. The flames were freehand along with my clown so that it blended in and so that it wouldnt be seen as a secondary image.. that they blended together.
Anyway back to my final step... using all Candies for the last step i added detail to the cigar and also to the embers of the cigar using orange and yellow. I went over the lips, nose and eyes with apple red to deepen the red even more and also give the lips alot more colour as they were to pale for my liking adding trans white to add highlights... finally using my flames as a secondary light source i added highlights to his brow tinting them purple then coming back with final highlights to try and make it POP.
Thankyou for reading this and I hope it aids you in whatever projects you may be undertaking... this being my first ever coloured project i am excited and pleased with how it turned out. I am also super excited to clear the project to really make it pop.
also this is my first ever thread so hopefully i have done it right haha... learn by doing isnt that what they say?? Step 1: Ok so at this point i had sanded it down with 80grit to get rid off old paint and filled the channels in the cover and wording with automotive filler. Then using Auto Air Sealer Dark gave it 4 coats and left it overnight.
Step 2: As the title tells what it is the customer sent me a picture of a clown that he wanted on the cover. I printed the picture and cut the face leaving behind the area to paint the face. Going in with Auto Air Transparent White I went in and started freehanding all the details of the face with the white using the cutout as a stencil and application tape as a shield to protect the cover from overspray. Step 3: I decided to start adding details and shading so mixing Auto Air Trans White and Trans Black to make a light grey mix i began working details into my soon to be dark areas. as you can see the grey is very light but gave me an understanding of where i needed to go darker and also where i needed to keep my highlights.
Step 4: After finishing with the grey shading mixture I decided i wanted to add colour before I began going in darker with shading to make sure my colours dont dirty up and stay and clean as possible. Using Auto Air Trans Red I slowly worked my way around the areas required to be red. making sure i went in deeper in the darker areas to give a sense of depth.
Step 5: I begin going into the dark areas with a 50/50 mix of Auto Air Trans Base and Trans Black trying to not kill the painting in black and going to dark too quickly.
Step 6: after fimishing the black i was happy with the progress of the clown and was trying to figure out if I go with hair like in my ref picture of the clown or make his hair look alive with flames. Flames won
... I can honestly say this was the most terrifying part for me as i had never really tried flames so starting off with a mix of Trans White and Trans Cobalt Blue i began laying out the flames and adding detailed licks throughout the flames.as I missed afew steps of the flames I would go over each layer of blue with Auto Air Candy Purple. Each layer after the purple candy became lighter until i had pure white in my airbrush for final highlights at the hottest part of the flames.
Step 7: as i was having problems uploading images to this thread this is my final step but i will also go back over and explain step 6 some more.. so as you can see with the multiple layers of Transparents and Candy Purple I tried to get a sense of depth and intensity but i also didnt want it to look plain I wanted it wild and crazy..... just like my clown. The flames were freehand along with my clown so that it blended in and so that it wouldnt be seen as a secondary image.. that they blended together.
Anyway back to my final step
... using all Candies for the last step i added detail to the cigar and also to the embers of the cigar using orange and yellow. I went over the lips, nose and eyes with apple red to deepen the red even more and also give the lips alot more colour as they were to pale for my liking adding trans white to add highlights... finally using my flames as a secondary light source i added highlights to his brow tinting them purple then coming back with final highlights to try and make it POP.Thankyou for reading this and I hope it aids you in whatever projects you may be undertaking... this being my first ever coloured project i am excited and pleased with how it turned out. I am also super excited to clear the project to really make it pop.