Progress?

Muzzz

Double Actioner
Hey folks, just wanted to upload a sample of my impromptu practice sheets in the hopes that I'm making some kind of progress in the right direction. Not sure if this is the right forum?

The left was my first attempt 2 weeks ago, with CI black straight out of the bottle at 20PSI.

The right is from today, with CI scarlet mixed 1:1 with transparent base, and thinned 25-30% with water (ok this is a WAG, i used 5 drops of paint, 5 drops of transparent and 4 drops of water), at 20PSI.

I'm using a Badger Patriot 105 on 60lb sketch paper, it absorbs water well. I was also playing with masking with paper towel, my hand/thumb and a wire scrub brush.

Constructive criticism welcome, and thanks in advance
Murray
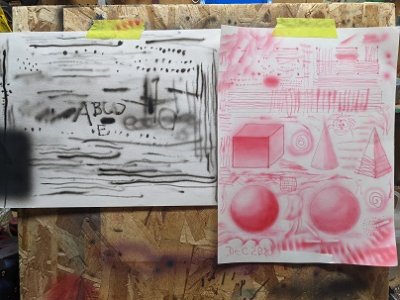
progress1.jpg
 
Last edited by a moderator:
Constructive "Feedback" never criticism.

I can see a definite difference between the two practice sheets. Black and white are usually the 2 worst colours for tip dry. I wouldnt recommend black to practice with because of the problems you could possibly have.

The black sheet looks quite rough as in the steadyness and smoothness/consistency of the dots and lines. The red looks a lot smoother and more controlled. It may be because of the trans base and reducer you added to the red. There is a difference in the lines regarding smoothness and consistency in thickness, the fades look good although there are none on the black page, so can't compare them. Maybe try the black with the same mix as the red and see how it sprays compared to out of the bottle. All colours will be different as in how much base and reducer you need to get the same consistency.
Colours are different and you will have to learn your paint system as to how much you need for one colour compared to another.

There is a definite progression in skill level/control comparing the 2 sheets. Keep up the practice, you will only get better.
 
I’ve embedded the picture for easier viewing.
Although there is a difference between the two you will really only see the difference if you paint the same subject with the same paint/reduction etc.
it could be the old faithful ‘eye’ ... grab a reference, paint it, date it, do it again in a month or two, date it, do it again in a couple of months, date it. You’ll notice the improvement :)

In the beginning you have almost no control, so thinks are going to look rough, that’s normal. As control improves so will the outcomes.
Grabbing a colouring in book will help train your brain and technique to
a) stay in the lines
b) figure out where shadows would be from different light sources.
You are on the journey, that’s all that matters :)
 
Thanks for the feedback gents! Appreciate you taking the time to look.

Interesting what you say about black vs other colors, I'm already noticing differences in how the paints mix up in a plastic cup. I was trying to keep the pressure similar to reduce the number of variables, but maybe I should mix up paint first and then adjust pressure accordingly? Trying to understand how reducer/water affects atomization in the brush, it's like turning 5 knobs at once.

Great idea to set a benchmark on the eye and reattempt it once in awhile to make a more objective comparison. I actually tried the eye shortly after the left practice sheet but it was so horrible I destroyed it in a fit of rage hahah (I blame the red wine). This hobby should help teach me some patience!

As far as references go, I need to start finding some. Am I better starting off with simple landscape scenes? Animals with fur or hair seem kind of daunting. Also is it easier for a beginner to start with paper masks & stencils, or grid, or trace/draw the image lightly with pencil and fill in? Or do people just learn to freehand right off the mark? I guess i'll try it all.

Enjoying the journey!
Lots going on in that post. Let's see...

As far as paint reduction, it helps to understand why the paint is doing what it's doing. If it's chunky or really grainy, either it's too thick or the pressure is too low. If it's spidering and blowing around on you, it's either too thin or the pressure is too high. There's more to it than that, but understanding that little bit makes things much less complicated. After that, you just try to mix it to a consistency close to milk but not quite water, see how it sprays, and adjust either the reduction or the pressure accordingly. You have to experiment, but you'll get it.

I'll let some of our more experienced members address the rest.

Keep at it!
 
My thoughts:
You mentioned your reduction of 5:5:4 (paint:trans base: water) think of transbase as colourless paint (because it is) so you now effectively have a 10:4 ratio, which may be a little thick for 20psi through a .35 or less (you didn’t mention what needle size youre working with)
You can add drops of water direct into the cup as needed (back flush to mix) until you get a good consistent flow. Water will be fine as a reducer on the paper you are using but will likely spider on a hard surface so have some 4011 or 4013 reducer handy. Letting the paint and reducer sit and mix for 5-10 minutes will make a big difference when spraying.
Spidering can also be caused by moving to slow, you’re in one spot to long and end up with excess paint on the paper.
Avoiding that comes with confidence and the more you practise the more confident you will become. I can pull consistent hairlines in my scrap test paper but on the proper substrate I still struggle... the test paper doesn’t matter if I screw up so I don’t care and just go for it, now if I can transfer that confidence to the proper substrate I’ll be happy :)

as for references: pick things you like, find a simplified version of it, or just pick a section of it. use what ever makes it easier for you, shield, torn paper, stencils all have their place. Be careful with masking tape, it can pull existing paint from your substrate if it’s too tacky or your prep isn’t solid
 
Thanks for all the great advice and support everyone, yes Jackie it seems confidence is a primary tool.

OK here's my new attempt at an eye, in black...I know I said I'd work in another colour but I managed to get the mix and pressure right on test paper first with no spidering so I figured I'd just keep on and try to master the black a little more.

I used tracing paper with a soft pencil, seemed fairly straightforward. This was with CI black and trans base 1:1, and then that mixed with water 1:1, through my badger 105 with .5mm needle, on Strathmore 300 bristol. I'm not confident enough to AB the fine lines yet so i used a hair brush for the lashes and eyebrow.

I tried to erase with a hard white eraser in a few places but it did more harm than good, I need to get the correction process figured out, seems to be lots of good info here now that i've learned to search better!

16025-1609546822-4be57cd10d3a7aa03a5345eda066ef6e.jpg

eye-benchmark.15149
 
You are on the right track. That's a better looking eye than I have been able to produce yet. I see what you are trying to do with the skin texture, and looks good. Keep working on that. The shadows and fades for the most part look good. A big issue I had with that initially was values and contrast. I would spend too much time focusing on the specific part I was painting and it would end up being much darker than the adjacent parts. Screws everything up. You seem to have a handle on that. As for the line work, it's all about practice. It will come.

One question, though. CI paint is already transparent. Is there a specific reason you feel the need to add trans base to it? Just curious.

If nothing else, you seem to be getting more comfy with mixing paint, which is a biggie.
 
Off to a great start, well done !
Karl has said pretty much everything I would have said.
No shame in using a hairy brush for the fine lines, some of the pros use them too :)
@Karl Becker using the trans base helps to keep things light, helps to not go too dark too quick
 
You came to the right place, this is the best airbrush forum in my opinion, lots of wise artists here to get tips from.
Keep practicing, I use posterboard as a medium to paint on, its scratchable and fun to use. I use clayboard now for my paintings, but to me posterboard is where its at, you can even frame it if you like your finished painting!. Watch alot of youtube videos, the more you practice the better you will get. Ive also learned that if you want to be next level "eventually", you will need a teacher ;)
 
Back
Top