This looks a lot more daunting and complicated than it actualy is, it does requier some "technical" knowledge though (wel requier might be a big word but it wil help

)
First of you'll need to have a grasp of grey scales. I'll be refering to that and the basic explenation of the can be found here:
http://www.airbrushforum.org/threads/greyscales-the-basics.9901/
This picture will requier a lot of erasing so the surface you are working on will also to a great extend determine the feasibility. Normal paper will almost certainly not work, canvas with it's own texture would need to be made smooth with gesso so I think the easiest option is airbrush board (clay board, schoellershammer, cresent)
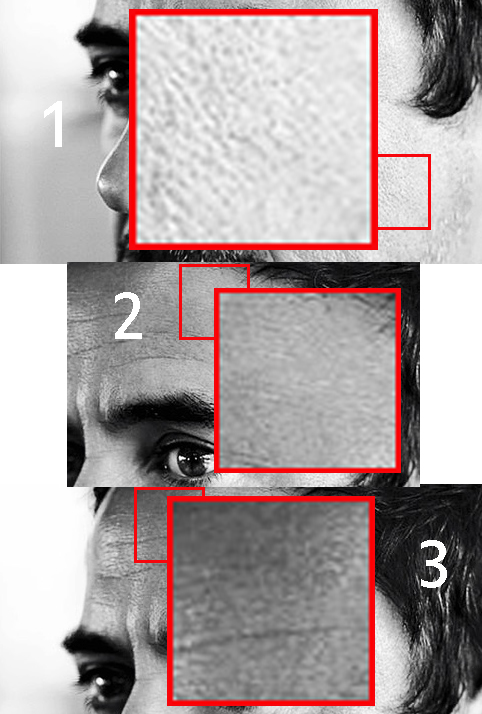
You'll need to look for gradations in greyscale to know how to aproach each area. For ease of explenation I'll refer to them as highlight areas (1), Midtone areas (2) shadow areas (3)
1. Highlights
Check the grey scale of the highlight areas (average grey scale of the darker/texture parts, not the white highlights). I think its somewhere around scale 7. You now do the whole portrait but don't go any darker than 7 on the greyscale. To avoid going to dark "over reduce" the paint (1 paint /2 pigmentless paint/ water till it flows nicely (2-3))
Try to airbrsh a bit of the texture (watch directions etc) as that wil just look better, but most will be done with the erasor. In the highlight areas (1) you could sufice with just a coat of paint and bringing back the highlights with an erasor in the midtones and shadows (2 and 3) it will requier some detail airbrushing
With the whole portrait at greyscale 7 use erasors to get back the lighter parts (gerneral light parts, highlights and textures). Electrical erasors are probably easiest for the fine texture , erasor pencils or fiberglass for the rougher/smoother tetxure).
You are now done with the highlight parts.
2. Midtones
The dark parts of the midtones are about greyscale 4 I guestemate. So we now don't go any darker than greyscale 4. Do all parts of the portrait except for the areas defined as highlight, those should be finished as the don't go up to greyscale 7. The darker you go the more detail work with the airbrush is requiered. In the highlights you achive texture mainly by erasing, in the midtones its 50/50 airbrush and erasor and in the dark areas it's mostly airbrush.
Make sure you hit the whole of the midtone/shadow area's with paint. Those areas already have greyscale 7 in their "dark parts". By adding layer of paint those areas already brought up to 7 will get darker. Do this till they are at value 4. By doing this all the erasing back to white you did has also been hit by pain and should now be at greyscale 3 (if you look at picture 2 you don't have white highlights in the midtones but a difference in grey which you should get by building up like this.)
Now erase back to white where needed in the transition areas between the midtones and highlights. You Don't erase in the midtone and shadow area's, the midtones should be done now and the shadow areas have to get darker, not lighter.
3. Shadows.
The shadows go to black (greyscale value 1). This will almost all be detail airbrush work. Repeat what you did for the midtones but only for the shadow areas and transition areas between the shadows and midtones.
As a finisging touch use a knife or electrical erasor to do the few white highlights in the shadow areas or where ever else needed. This is a rough guide tht should enable you to do 90% of the texture is some areas you might ahveto deviate a tad but you'll notice those when you get to them
ps this is ofcourse only one of a lot of way's to go about it, and I'm certainly not saying it's the best or easiest way, but it's the way I'd go about it
 Hi guys