haasje dutchairbrush
Air-Valve Autobot!
As I seem to refer to greyscales a lot in replies I thought I'd make my life a tad easier by making a post I can refer to :witless:. This is by no means the ultimate/sientific write up but should explain the basics.
Greyscales the basics.
When copying a painting, whether in color or monochrome it is important to keep the greyscales (transitions from light to dark) in mind. The light and dark determine how we perceive an image.
When for instance we have a nose the light and dark areas fools our mind that we see a 3d object on a 2d surface. As we are basically fooling our mind this also means that if we don’t get the light dark values correct our mind will perceive it differently. A shadow on the side of the nose that is too dark for instance will in our minds look like it stands further out.
When trying to achieve a realistic look (portraits for example) we need to keep the grey scales in mind.
Basic grey scales.
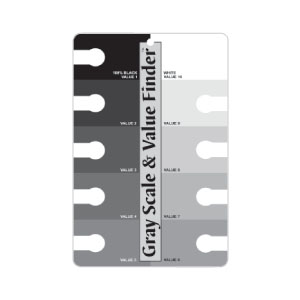
The basic greyscale (img 1) runs from dark to light, where 1 is black and 10 is white. Now one may think “yup that’s nice but when I see a black and white image that’s obvious”. The way we perceive a value in an image is however influenced by the scales surrounding it. If we take a chess board, a square surrounded by darker squares will be perceived as lighter than a square surrounded by lighter squares.
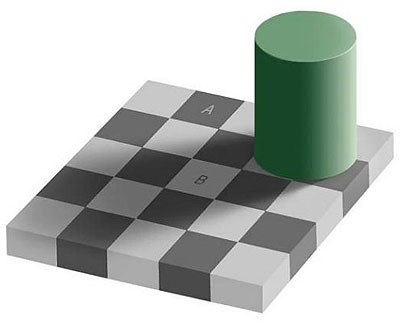
In img 2 we have a square A and B. Although B looks a lot lighter it is actually the same color (grey value) as A. The difference in perception is caused by the light/dark values of the squares surrounding them.
This means that even when one is doing a straight forward copy of a black and white image it is important to check the value of an area before painting it as one doesn’t want to be fooled by the values surrounding it.
A nice trick to do this is by isolating the part of the reference you are about to do. Cut out a small square in a piece of white paper and keep it on the area you want to paint as you now don’t have any values surrounding it to fool you one can see exactly what value the area has.
Img1:
img2:
Translating a greyscale.
As an airbrusher we will often want to “translate” an image to another color (sepia is often used in monochrome portraits for instance).
One is than faced with the problem that the black in the reference is actually darker than the darkest the sepia can get.
To solve this we paint a transition from the darkest to the lightest we can get with our paint (carefully layer a transition). We than can add numbers to our transition from 1 to 10. We now have a translation strip (img3). If something on the reference is value 6 for instance you just have a look at your translation strip and find value 6 to know how dark you can go. This way you could even “translate” a black and white painting correctly to a very light color like yellow.
img3:

Greyscales the basics.
When copying a painting, whether in color or monochrome it is important to keep the greyscales (transitions from light to dark) in mind. The light and dark determine how we perceive an image.
When for instance we have a nose the light and dark areas fools our mind that we see a 3d object on a 2d surface. As we are basically fooling our mind this also means that if we don’t get the light dark values correct our mind will perceive it differently. A shadow on the side of the nose that is too dark for instance will in our minds look like it stands further out.
When trying to achieve a realistic look (portraits for example) we need to keep the grey scales in mind.
Basic grey scales.
The basic greyscale (img 1) runs from dark to light, where 1 is black and 10 is white. Now one may think “yup that’s nice but when I see a black and white image that’s obvious”. The way we perceive a value in an image is however influenced by the scales surrounding it. If we take a chess board, a square surrounded by darker squares will be perceived as lighter than a square surrounded by lighter squares.
In img 2 we have a square A and B. Although B looks a lot lighter it is actually the same color (grey value) as A. The difference in perception is caused by the light/dark values of the squares surrounding them.
This means that even when one is doing a straight forward copy of a black and white image it is important to check the value of an area before painting it as one doesn’t want to be fooled by the values surrounding it.
A nice trick to do this is by isolating the part of the reference you are about to do. Cut out a small square in a piece of white paper and keep it on the area you want to paint as you now don’t have any values surrounding it to fool you one can see exactly what value the area has.
Img1:
img2:
Translating a greyscale.
As an airbrusher we will often want to “translate” an image to another color (sepia is often used in monochrome portraits for instance).
One is than faced with the problem that the black in the reference is actually darker than the darkest the sepia can get.
To solve this we paint a transition from the darkest to the lightest we can get with our paint (carefully layer a transition). We than can add numbers to our transition from 1 to 10. We now have a translation strip (img3). If something on the reference is value 6 for instance you just have a look at your translation strip and find value 6 to know how dark you can go. This way you could even “translate” a black and white painting correctly to a very light color like yellow.
img3:
")