Attempting to save an abused Paasche AB Turbo

Proxin

Double Actioner
Oh boy, what have I gotten myself into with this one…

I saw one online for a steal and I just couldn’t help myself. Shes been beaten and abused and will need a lot of work, but I just had to see what all the hype for this unique little brush was all about.

IMG_0836.jpegIMG_0838.jpegIMG_0839.jpeg
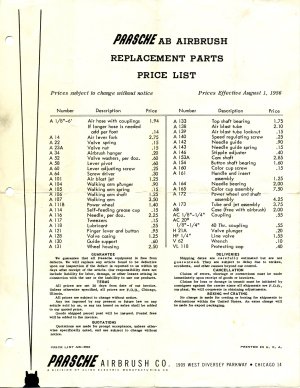
Judging by the case and handle I would guess it’s from around the 60s, but I can’t be certain. Almost every part of this airbrush is gunked up, and it’s missing quite a few parts. I have to give props to Paasche though, as they still sell nearly every part for this airbrush on their website. You can see in the pictures that the airspeed regulator screw has been broken off inside the thread, so that’ll be fun to remove.

One thing I didn't notice until it arrived is the needle guide post has also broken off. I thought I was gonna be SOL since it’s permanently attached to the body and I couldn’t find the part at first, but after some research I was also able to find it available on Paasche’s site. The item number is ”A-130 GUIDE POST”, so I’ve ordered that as well. Now I need to figure out how I’m gonna get the old one off. Looks like it’s either soldered or welded on. Any suggestions?

I was able to take most of it apart:
IMG_0003.jpeg
I couldn’t get the walking arm plunger or lever out, I think the air valve assembly needs to come out first and it doesn’t want to budge at the moment. I know that for this thing to work properly it has to be perfectly clean and properly lubricated, inside and out. so I’m gonna spend the next couple of days just getting everything as clean as possible, Hopefully it can be saved!
 
Your AB is from the early to mid 50s. By the 60s the handles were red but lacked the "collar" that yours has. Also the "Paasche" logo on the inside top is when Paasche was owned by Cline Electric Company from 1952 -1956. *This is an educated guess using various Paasche ephemera; See attachment. (Any help with dating is more than welcome!!!)

The guide post is "spot"soldered onto that square "bar" from the factory but not as messy as yours is. The problem you have is you need to unsolder the old post from the "bar" without unsoldering the "bar" from the body. Clamping the bar to the body is your best bet. A clamp would hold the bar in place and act as a heat sink.

Where are you? In the states?
 

Attachments

  • -1956-8_Paasche_Airbrush_AB_Inst_02.jpg
    -1956-8_Paasche_Airbrush_AB_Inst_02.jpg
    428.1 KB · Views: 5
  • -1956-8_Paasche_Airbrush_AB_Inst_02.jpg
    -1956-8_Paasche_Airbrush_AB_Inst_02.jpg
    428.1 KB · Views: 4
Wow, thank you @airbrushmuseum for all the info!🙏 I can‘t seem to open the link you posted, maybe because I’m not on desktop at the moment, I’ll have to try again later.

I’m in SoCal Btw
 
Beautiful Turbo you got there, I surely hope you resurrect that Gem, it’s so fulfilling to see an abused airbrush being restored and running. 😍👍
 
The progress so far:

While waiting for parts I was able to take off the guide post and air regulator screw. I then gave everything a good thorough cleaning and polishing, and decided to see if I could test out the turbine. After putting it all together and lubing all the places that needed it, I covered up the little hole on top with my finger, gave it a test and…SHWEEEE! It spins quite well! Now I’m getting excited!

Here it is all cleaned up:
IMG_0845.jpeg
 
IMG_0851.jpeg


Got her all back together now. One part I didn’t order was the guide spring ($5 for a tiny spring, ouch!) but I ordered a similar size on Amazon for way cheaper. I had trouble mounting the guide post, no matter what it just didn’t want to stick. I was able to pull the old one off just fine with some heat and motivation, but no amount of flux or solder would join these two. It ended up leaving quite a mess of solder, which I then had to painstakingly remove. I settled on using a little epoxy that know will keep a strong bond. It’s arguably even less pretty than it was before, but at least now I have a working needle guide.
IMG_0854.jpeg

I probably spent over an hour just shaping the needle till it felt right and wouldn’t bind. My first test (~30psi) with black acrylic didn’t go so well. It splattered all over the place and made a huge mess. I think I thinned the paint too much, as it would just seep out of the bearing and not actually get picked up by the needle. The next test I used less thinner, and it came out a bit better:
IMG_0852.jpeg

It’s still splattered, though not nearly as much. I didn’t mess with the stipple or airspeed adjuster, as I’m still trying to figure out the right thinning ratio. Seems it likes slightly thicker paint?

I noticed that a small amount of air leaks out of the top hole of the air valve when pressing the trigger. it’s not a huge amount, but seems substantial enough that I have to compensate by increasing the PSI. I‘m wondering if anyone else with ABs have this or if the air valve on mine is just worn down and needs replacing.
 
Just did another test with Vallejo model air straight from the bottle, that seemed to fare much better. It still needs some adjustments, but I’m getting the hang of it. I’m finding it way more difficult to get used to the offset nozzle setup than I thought. This thing is like driving an exotic vintage Ferrari when you’ve been driving Corolla’s your whole life.

Still, I can definitely see myself using it, certain camo patterns and weathering effects I can see this brush handling extremely well. Honestly I wasn’t even sure I would be able to get it to work, I thought I was in way over my head with this one. It was definitely a learning experience working on it, and who knows, maybe one day when I’m older and wiser I’ll go back and actually attach that guide post correctly.
Proxy I’m glad you got your Turbo AB to work. 👏Kudos to you for being so resilient and dedicated to it, and most of all patient.🤩 This unique airbrush requires a lot of time, and care, especially when found in the condition that you had found it🤕. I myself found one in struggling condition and thanks to the help from our friends in this wonderful forum I was able to restore. I am still learning, but I’m a lot more confident about working with them. 🤓

Lately I’ve been overwhelmed by work and my studies so it has left me little time to attend to airbrushing.😅 I do need to attend to their maintenance soon though so they don’t hardened up in case I missed a spot during their last cleaning.
I love these AB airbrushes, and they are worth any of my time spent on them. Congratulations on such accomplishment! Thanks to your experience we all have a little more reference for our future work with these unique Paasche AB Turbos! Best wishes with your airbrushing! -Lisa 🙏😊
 
Great job on the restore!

You can regulate paint flow a bit by rotating the needle bearing to reorient the opening where it meets the color cup. I had the same issue when I first was using them with Vallejo MA.

After swapping out the needle bearing with new I tested Createx Illustration reduced by 70% and it sprayed beautifully, the first time in my experience without dripping from the needle bearing.

It's really an incredible balance of needle travel, speed, air blast volume and direction. Maddening too.

The most use I've gotten out of mine were for stippling. When I made my own needles years ago from very thin music wire and narrowed the air blast orifice with a brass tube insert I could get incredibly thin lines and control using Vallejo, but with the occasional needle bearing collection and inevitable spit, I wasn't going to risk it on a model. In the past I used to wrap the business end with a piece of paper towel to collect drips, not ideal by any measure.

With my completely rebuilt Turbo (all new parts) I'm going to give it a go with illustration, but for tight camp patterns on models I'm going to stick with the CR plus .15mm or the Creos 771 .18mm. No surprises there.
Thanks for the info! Rotating the needle bearing definitely helped. Ive been practicing using it on plain paper for now, like you said it still spits and until I’m confident I can control it I‘ll be holding off using it for a model. I’ll have to get some createx paints and try that. Making your own needles from music wire is a neat idea. Would guitar strings work? What gauge wire did you use? I could save money rather than buying the overpriced needles from Paasche.
 
Thanks for the info! Rotating the needle bearing definitely helped. Ive been practicing using it on plain paper for now, like you said it still spits and until I’m confident I can control it I‘ll be holding off using it for a model. I’ll have to get some createx paints and try that. Making your own needles from music wire is a neat idea. Would guitar strings work? What gauge wire did you use? I could save money rather than buying the overpriced needles from Paasche.
Createx Illustration is a transparent paint. I plan on using them for models as a shading over a Vallejo base coat. I have a primer 1/48 Tamiya tractor that I sprayed CI with the Creos 771 for some nice effects. The beauty of CI is its erasable, basically having the best elements of a filter or wash. I got some really nice effects by rubbing it off. I don't think you'll have issue with Vallejo in the Turbo, just try different ratios of reducer. I find a mix of 70/30 flow improver to AB thinner is the best Vallejo reducer.

I don't see why an E string wouldn't work. They're nickel and something in an 8 or lower would probably be good. I'm a bass player, so mine are out and I have a 60s Jaguar that I use for surf, but that has 14s on it, they're not much thinner than the Paasche needle. I haven't put the micrometer on the Paasche needles in a long time, but anything thinner would allow you to get a finer line. Shape the point before you make the bends. You could also play with the length and travel to cut down on friction and positioning of the needle bearing to cut down on how much paint moves.

On my older one without the changeable needle bearing, I put a layer of epoxy in the color cup which allows me to fine tune the hole via a drill bit to restrict paint flow. Like all things Turbo, it's a balancing act.

My fascination with these brush stems from being denied even looking at one by the counter man at Pearl Paint back in the early 80s. I know they have been widely used by pros with amazing results, but that's eluded me for the last 10 years. I just play around with them for a while, then realize that I don't have to struggle if I just pick up the Iwata, H&S, T&C or Aerograph and get spraying.

My recent parts buy was to rebuild them to new condition for sale, but it coincides with me getting the bug to try illustration, so I'll be giving them another shot. But, I have no illusions that at its very best, it will out perform the Micron Takumi (or the 771 for that matter).

IMO they have very little use in the model painting realm, except stipple effects for mud or weather, but other brushes can pull that off too.
 
Back
Top