need help with paasche vintage airbrush

5

51kbos

Guest
Hello fellow artisans....

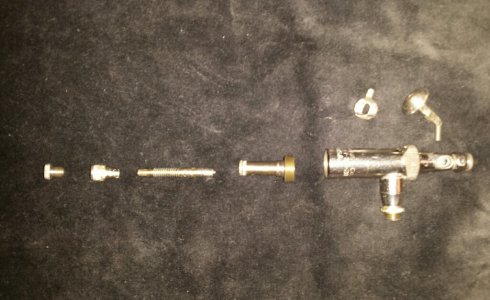
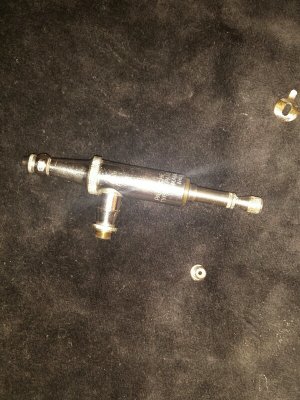
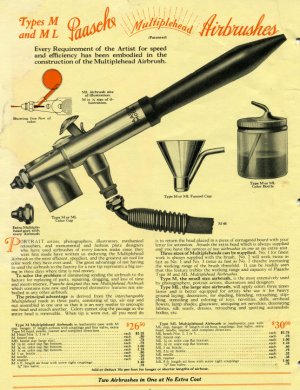
I am hoping for assistance troubleshooting a 1920's Type M paasche airbrush. When I acquired it several years ago, I was unaware of its age. I fiddled with it a bit, lost interest and It got tossed into my PPB and forgotten. It is normally ill - advised to open the PPB, as it can effortlessly suck hours from your day..But i opened my Pandora's Project Box today and found I have need to use this airbrush. Which led me here.
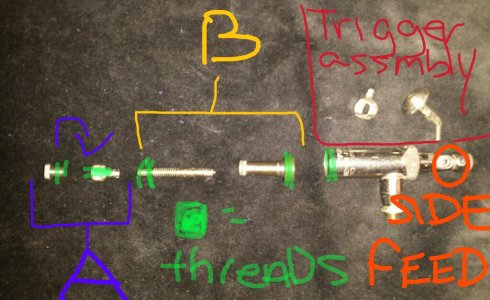
I understand the basic assembly and mechanics of an internal mix, double action airbrush. But I'm not quite sure about this one. I can't figure out why I can't lock the needle in the ¿rocker valve assembly? So when the trigger is pulled back, the needle moves too and not just the rocker. ..
I was hoping to find anyone willing to throw some advice my way to help me troubleshoot it. Thank you in advance, your time and assistance is much appreciated..I hope you have a great day!
 
Hmm, 1920's airbrush... better make sure it's in good nick and keep it as a vintage piece. There are likely to be seals in there that have perished and unlikely to be replaced. It could well be why the needle isn't moving. Have you taken it apart before? Hey can we also get you to go along and give us an intro... what sort of things do you do airbrush wise, what part of the world do you live in (can be very useful for parts) that sort of thing. Here is a link to the intro page. http://www.airbrushforum.org/introductions/
 
My apologies...
Intro done... Thanks for the link

As for my type m paasche airbrush...
When i first got it, i gave it a good cleaning, and It was working, albeit not wonderfully, but working. I was real careful when I partially disassembled it, to make sure I got it back together right, but I know it has been fiddled with since then by a certain mischievous nephew of mine. So I'm not 100% certain about it being put back together correctly. And it's been so long, I don't remember every piece in it.
 

Attachments

  • 2016-07-06 23.45.58-1024x628.jpg
    2016-07-06 23.45.58-1024x628.jpg
    143.7 KB · Views: 28
  • 2016-07-06 23.50.18-600x800.jpg
    2016-07-06 23.50.18-600x800.jpg
    166.6 KB · Views: 25
That looks like the needling chucking nut second from the left... does that fit over the needle and hold it into place?
 
Ok... so pieces in group A are what I believe equivalent to a lock nut, holding the needle in place. Group B no idea what it's called, but on a more modern gun, the piece with the spring will only fit inside the other 1 way, it will have flat spot or something that will prevent it from spinning. This does not. So after threading the needle through you can only screw on the cone shaped nut couple turns before it starts spinning. My girl brain can't grasp how this hollow piece along with the T shaped piece that screws into the back of it is supposed to lock the needle that passes through something that doesn't lock in place?
I marked threads in green. Piece 2 is internally threaded at both tip and tail...
I don't know if that makes any sense but I hope it does
 

Attachments

  • PicsArt_07-07-05.41.14.jpg
    PicsArt_07-07-05.41.14.jpg
    165.3 KB · Views: 13
I tried to find that airbrush on the net but besides a few pics I could not find anything about how to assemble the airbrush .
by looking at your photo I get the feeling the T shaped part should be turned 180 degrees but I am not sure
 
The only thing I found was this
 

Attachments

  • Airbrush_1926_Paasche_Cat_M-ML2.jpg
    Airbrush_1926_Paasche_Cat_M-ML2.jpg
    144.7 KB · Views: 9
One of those things ya kinda have to have in front of you to fiddle with a bit, hard to judge by photo's but I'm sure someone out there prob knows how or has a manual or the like for it. Contact those mark advised, if anyone can help likely a museum..
 
I know it's hard not having it in front of you....so I sketched out the pieces I'm talking about PicsArt_07-07-05.54.46.jpgPicsArt_07-07-05.16.55.jpg
 
So the modern version has the rocker attached and a pin that keeps the needle valve support assembly in place, it's threaded at the rear for the lock nut... My question is how would the older lock nut setup with the two pieces I sketched lock the needle in? Any idea? I believe everything is here from when I had it working, but I have no idea how it locked the needle into the assembly if it isn't kept in place.
 
heya @51kbos, not sure if any will help but paasche seem to have a few older manuals as PDF's on their website..Can't find one for the m series but one of the others may help figure it out, also worth actually contacting paasche, who knows they may offer you a million dollars for it, maybe not LOL but they would likely have all the original documents relating to that model..Good luck.

http://www.paascheairbrush.com/products/manuals-price-lists-msds-sheets/manuals/airbrushes

Looking at what you've posted, the locking nut i would assume gets part 2 on the right top screwed into it but not sure why LOL, it seems to me thats something else maybe and looks like the nut generally used to screw onto the arm for spring tension adjustment, maybe possibly LOL..The locking nut should engane directly to the trigger arm shaft and that should have two notches out of it which with that locking nut (the one you wrote threads on) should tighten enough to clamp the arm with the notches onto the needle.(Thus moving the needle when the trigger is pulled back, if its not it may indicate its not clamping down on the needle) The other can be tight or looser pending on how much extra spring tension you want to add though in badger airbrushes its part of that arm assembly and generally can be screwed tighter to increase that spring tension.Though that design may have been reversed somewhat and may involve screwing it into the locking nut first, it is though really hard to tell but it should be a case of only part 1 can screw into a different part. I am wondering if the part top right you've drawn has something to do with a trigger stop design which seems to be incorporated in many early airbrushes and wondering if that part actually screws in closer to the trigger itself on top as shown in some diagrams i've seen looking this up..but just guessing :)
 
Last edited:
So the modern version has the rocker attached and a pin that keeps the needle valve support assembly in place, it's threaded at the rear for the lock nut... My question is how would the older lock nut setup with the two pieces I sketched lock the needle in? Any idea? I believe everything is here from when I had it working, but I have no idea how it locked the needle into the assembly if it isn't kept in place.
Looking at what you have number 24 is for spring tension
25 is the lock nut for the needle (most likely has a taper to the threads so as you tighten the jam nut it squeezing the needle)
Number 25a is the back cover of the brush
 
on your sketch you have part 22,23,24,and 25
22 and 23 = needle guide and spring
24 is to adjust spring tension
25 needle lock nut
part 20 = the pin and part 21 = the rocker are missing in the sketch but I have seen those in the pics

what I would do is = attach 20 and 21 to 22 , put the trigger in the body and slide the assembled part 22 into the body ( with spring) place part 24 and adjust the tension , place the needle and finally the lock nut part 25 and finally part 26 and you should be able to test the airbrush
 
The “M” Series Airbrush was replaced by our “V” Airbrush (now obsolete) replaced by our RAPTOR Airbrush currently.


John Lagerlof


Paasche Airbrush Co


In response to my query for information...

I must say I'm underwhelmed. Thanks paasche. ..
 
Back
Top