Rejuvenate Mold Max 30 Silicone with White Spirit

M

Melbee

Guest
UPDATE!! Since I wrote this post I have discovered that using White Spirit to thin the Silicone will make the Molds shrink more. So beware of using it unless the shrinkage is not important or you make the plastic castings immediately after casting the mold and therefore before it has had time to shrink.

Hi Peeps,
I wasn't sure where to put this because it's a kind of side track but I am making re-designed Airbrush Side-Cup plastic proto-types so it's definitely airbrush related.

Anyway, I've had a couple of Mold Max 30 mold making kits sitting around for a few years. One partly used and the other new. The Part A (silicone) was unporable, infact it was rubbery but I wasn't surprised because it was open and had sat for a long while. I WAS surprised to find the 2nd still sealed new kit silicone was the same rubbery consistancy. I know they have a shelf life but I wasn't going to give up on €40 worth of kit without a fight :laugh:;)

So after dredging the internet I came up with White Spirit (not Turps they are made different) and I found cheap White Spirit/Turps (yeah I know but is has the right ingredients) in a supermarket and which has Hydrocarbons in it. Also Artists White Spirit which has Mineral Oil which is also supposed to be good. OK I could buy Silicone Thinner but the Mold Making Shop is a very long bike ride away.

First I put 20% White Spirit in the Old silicone and started to mix, it was majorly lumpy but it did start to come back. After a long mix and using the back of a spoon on the tub sides to get rid of the lumps it was looking amazingly good but not pourable. So I then added another 10% but this time of Artists White Spirit and boy what a difference that made. After a lot more mixing I added the hardner and poured the first half of my 2 part mold. I know adding this stuff will weaken the silicone and probably extend the curing time but I'm not bothered. The kits would probably have gone in the bin so I had nothing to lose.

Anyway I thought I'd let you know there is a cheaper, more accessable option to rejuvinating your Mold Making Silicone as I'm sure you were all dying to know lol:laugh:lol

I'll let you know tomorrow how the molds come out but they seem to be curing ok so far :thumbsup: I have to wait an see :whistling: It's very exciting and I have no patience so the wait is killing ME!! lol:D And then I have to do the same for the other half before I can start pouring the plastic!! And THEN I'll find out I've been wasting my time lol:laugh:lol
 
Last edited by a moderator:
I've poured a few fishing lure mold's and the hard part is trying to get the bubbles out of the silicone so it won't deform the lure or in your case the new cup hope it works out for you!
 
I've poured a few fishing lure mold's and the hard part is trying to get the bubbles out of the silicone so it won't deform the lure or in your case the new cup hope it works out for you!
Yeah, aint that the truth basepaint?!! :laugh: Good to meet a fellow molder :) I can't believe it but I've just de-molded the first half of my 2 part mold and the silicone is brilliant!! So my rejuvenating worked!!! :D:laugh::thumbsup: I am mega chuffed with that. I paid €7 for the 2 types of White Spirit and I've saved €40 worth of silicone.........Yeeh Haaa!! I've suddenly gone al cowgirl lol:laugh:

I've just poured the 2nd half of the mold and I remembered to put in a pouring hole and an air escape hole :D:thumbsup: I sprayed it with Mold Release so I think thats every thing. He He Heeee I just love doing this kind of stuff. I also made a small mold to put plastic grips on the little screws for my existing plastic side-cups. I always mix a bit extra so I decided to put it to good use :)

I think casting the side-cup is going to be a whole different ball game. For one I don't think Smooth Cast 300 liquid plastic is going to work because the walls of the cup are so thin and the whole thing is very small. I also think it's going to be too brittle for the small tube to be pushed into an airbrush. Anyway we will see fairly soon because as soon as this baby is set I'm going to be pouring plastic! :D And the plastic sets very quickly!! Wha Hoo!!
 
Last edited by a moderator:
Hi Peeps,
I wasn't sure where to put this because it's a kind of side track but I am making re-designed Airbrush Side-Cup plastic proto-types so it's definitely airbrush related.

Anyway, I've had a couple of Mold Max 30 mold making kits sitting around for a few years. One partly used and the other new. The Part A (silicone) was unporable, infact it was rubbery but I wasn't surprised because it was open and had sat for a long while. I WAS surprised to find the 2nd still sealed new kit silicone was the same rubbery consistancy. I know they have a shelf life but I wasn't going to give up on €40 worth of kit without a fight :laugh:;)

So after dredging the internet I came up with White Spirit (not Turps they are made different) and I found cheap White Spirit/Turps (yeah I know but is has the right ingredients) in a supermarket and which has Hydrocarbons in it. Also Artists White Spirit which has Mineral Oil which is also supposed to be good. OK I could buy Silicone Thinner but the Mold Making Shop is a very long bike ride away.

First I put 20% White Spirit in the Old silicone and started to mix, it was majorly lumpy but it did start to come back. After a long mix and using the back of a spoon on the tub sides to get rid of the lumps it was looking amazingly good but not pourable. So I then added another 10% but this time of Artists White Spirit and boy what a difference that made. After a lot more mixing I added the hardner and poured the first half of my 2 part mold. I know adding this stuff will weaken the silicone and probably extend the curing time but I'm not bothered. The kits would probably have gone in the bin so I had nothing to lose.

Anyway I thought I'd let you know there is a cheaper, more accessable option to rejuvinating your Mold Making Silicone as I'm sure you were all dying to know lol:laugh:lol

I'll let you know tomorrow how the molds come out but they seem to be curing ok so far :thumbsup: I have to wait an see :whistling: It's very exciting and I have no patience so the wait is killing ME!! lol:D And then I have to do the same for the other half before I can start pouring the plastic!! And THEN I'll find out I've been wasting my time lol:laugh:lol
The white spirits (that isn't turpentine) is low octane petrol essentially. Often sold as coleman fuel for camping stoves. Hope it works well!
 
Thanks guys. I'm very excited because I have de-molded the 2nd half and that has also turned out great! So now I'm going to trim the mold, get rid of any unwanted bits and cut larger openings for the pouring and air holes.

@AndreZA I'd love to show you my cups :D but then I'd have to shoot you! lol

To be honest I don't think I can Patent them because there already seem to be too many Patents out there for my design to be different. It's not like I have come up with a new paint delivery concept, I have simply, as far as I am concerned improved the plastic cup so many annoying factors are eliminated. I haven't looked into it too deeply but I have a feeling I won't be able to Patent my side-cups but I might be able to protect the design although I find design protection fairly useless because all someone has to do is change the shape for it to become a new design! I've looked into Patenting a lot over the years, I've even written my own once and I can tell you that was an experience!!lol:laugh::D If anyone has any knowledge in this area concerning airbrush Patents please let me know :D

So I'm off to have a Mug of Coffee and start to play!! He He He Heee :D:laugh: I'll let you know how I get on :thumbsup:
 
Well the first cup came out and to be honest I'm amazed that it worked as well as it did. The Molds pritty spot on and for something so small and thin...I'm very impressed. Having said that the cup is basically useless lol:laugh: The good thing is I can see where the design needs to be improved for me to make these with the products I have at home. I need to thicken the cup walls slightly and there are other weak points. The most difficult part is the tube that takes the paint to the airbrush and I am very pleased to say that my method to create the tube worked!! :thumbsup::cool::D It is very precarious though and it will be hit and miss each time if it works or not.

The bad thing is that I now have to make new Molds for the improved design and wait 2 more days for that to cure before I can cast again. AaaaaH!!

Really it needs Injection Molding and funnily enough I don't have that equipment at home lol:laugh:lol But soon I will make the long cycle ride to the Mold Making Shop and see it they have any new products that might help my cause.
 
Last edited by a moderator:
I would be great of you can make a replica of the Iwata cup but just a bit shallower.
I'm not really looking at the Iwata cup, as great as it is, I personally don't like the feed tube being half way up the cup and the feed tube is extremely difficult to clean. I like the plastic cups I have because the feed tube is nearly at the top of the cup which means I can safely take the cup off my airbrush without the risk of leaking paint. Also it makes storing paint in the cup really easy.

Do you mean a shallower cone shape inside the cup? Can you put up a quick sketch of what you mean? I'm very curious. :glasses:
Obviously I can't replicate their actual cup because they would come and beat me with sticks or something :eek:
 
Last edited by a moderator:
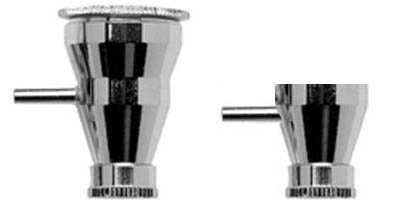
From the one on the left, to the one on the right.

iwa_0704_l__01278_std.jpg

BTW, I use the thinnest inter dental brushes I can find to clean the tube and cup paint shaft. The ones I use is a local cheap brand and the length is perfect as it is just as long as the both shafts.
 
Hey EVERYONE!!!
I can't believe it!! My 2nd casting of my side-cup WORKS it actually WORKS!!! Ha Ha Ha!! I'm stunned! I thought it was faulty like the first one (that kind of fell to bits :()but I gave this one more time to cure and amazingly it got stronger than I expected and then the 2nd thing which was the hardest part of all ....... the tube where the paint goes up into the airbrush WORKED honestly the dam thing WORKED!! Ha Ha Ha! I really can't believe it.

I've only just put water through it on my Eclipse side-feed and I haven't tried actually painting anything yet but hey? How about those apples?!!! It just goes to show my year studying Design Technology was not wasted. It's taken me the best part of a year to come up with this design (mostly in my head) and finally I made it, so you can imagine I'm a little excited. However it's not like I invented the 2nd Wheel or anything Ha Ha Ha Ha Haaaaa!!! lol:laugh:lol

OK, so what's so great about this flaming side-cup.......
Basically it just makes life a lot simpler. Put paint in the cup, put cup in the airbrush, PAINT with paint almost always being delivered, take cup off the airbrush, clean easily if empty or put lid on and cover to keep paint for next session. It's my DREAM cup and I MADE IT!! Ha Ha Ha LMFAO!!

Thanks for letting me LET RIP!! :) :)
 
Last edited by a moderator:
From the one on the left, to the one on the right.

View attachment 31957

BTW, I use the thinnest inter dental brushes I can find to clean the tube and cup paint shaft. The ones I use is a local cheap brand and the length is perfect as it is just as long as the both shafts.
Infact AndreZA your example is kind of like the cup I've just designed except it is not based on the Iwata cup which has the screw off bottom. I don't like that. Having read your tip of the very thin dental brush I've just tried one of my old ones in the bottom hole of the Iwata side-cup and it fits!! Thanks for that :D
 
Last edited by a moderator:
I wonder if the Aerograph cups will fit. It's only 1cc.

aero-ac-1800.jpg
 
Take some pics Mel. Would love to see what you've done :)
I'd love to show you Boltcase because I am so excited about making it after all the difficulty of trying to figure out what I want it to do and then how to make a Mold that will be able to produce it. It really is not simple at all and then to find out that I what I thought might work, actually does work!! now that is a big Buzz!

However there is still a possibility that I might try and Patent one or more of my concepts so I can't show pictures or give any details at all incase it's in breach of Patent rules. I have to do some research and if it's not Patentable or worth the bother then I'll put up some pictures. :D But for the moment lets just say it's a Side-Cup and it's majorly Cool!! :cool::laugh:lol
 
I wonder if the Aerograph cups will fit. It's only 1cc.

aero-ac-1800.jpg
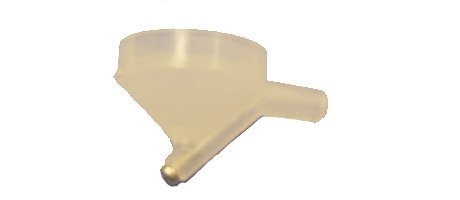
lol:laugh: They look like they might!! But why bother? I have a couple of these that I never use, they came in a the Conversion Kit with the bigger ones that I like :)
Very Small Plastic Side-feed Cup.jpg
 
Mel, I use two drops of paint per 1-2hr session at night. Do the smaller cups might suit me better.
 
I'd love to show you Boltcase because I am so excited about making it after all the difficulty of trying to figure out what I want it to do and then how to make a Mold that will be able to produce it. It really is not simple at all and then to find out that I what I thought might work, actually does work!! now that is a big Buzz!

However there is still a possibility that I might try and Patent one or more of my concepts so I can't show pictures or give any details at all incase it's in breach of Patent rules. I have to do some research and if it's not Patentable or worth the bother then I'll put up some pictures. :D But for the moment lets just say it's a Side-Cup and it's majorly Cool!! :cool::laugh:lol
That makes total sense Mel. I dont blame ya one bit for holdin off on pics. Cant wait to see em with that perty little patent on em :) :)
 
Mel, I use two drops of paint per 1-2hr session at night. Do the smaller cups might suit me better.
Well you can get these from airbrushes.com singular https://airbrushes.com/product_info...id=74&osCsid=9ea1fd3cfa209991d8d6c14928a01ca0 but you have to buy the adapter as well or you could just buy a Kit with 7 x cups + Adapter OR as you are handy and like to modify things like me, you could sand down the paint delivery tube until it is the size to fit an Iwata side-feed airbrush.

I did it to loads of mine because I was alway struggling to get the flaming adapter out of the airbrush and got fed up. I put the cup via the tube onto a No.2 drill bit attached to a variable speed drill, I put sanding paper on a piece of wood that allowed the edge of the plastic tube to touch the sanding paper but the cup could rotate freely behind. Is this making sense to you? Anyway, sand it down to the size it will fit the Iwata side-feed opening and you'll be sorted. Just be careful not to go too fast and go too far. I also did it a slight angle so the tube was tapered just in case :)
 
Back
Top